UBC IT offers two internet access services: Netinfo and Interchange. A Netinfo account is available free of cost to all current UBC students and allows twenty hours of Internet access per month. Interchange accounts are available on a paid subscription basis to staff, faculty and alumni, as well as non-UBC customers.
This document explains how to set up Macintosh OS 8 internet connectivity using the internet setup assistant.
Step 1: Setting up your new connection
- Open the Internet Setup Assistant. This can be found in either the assistants or the internet folder of your hard drive.
- Click on the update button. Read the introductory window, then click on the right-pointing arrow to continue to the next window.
- Select Add Internet Configuration, then click on the right-arrow to continue.
- Name your connection.
- If you are a Netinfo user, call your connection Netinfo.
- If you are an Interchange user, name your connection Interchange.
- Choose whether you are using a modem or a lan to connect. If you connect from home, most likely you will should select modem.
- Click on the right-arrow to continue.
Step 2: Selecting the modem
- Choose your modem from the list. You may need to cycle up or down to find your particular modem.
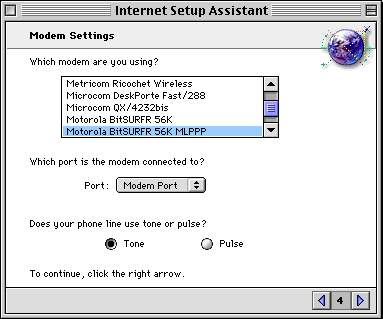
- Under port, make sure the option selected corresponds to where your modem is attached. In most instances, this will be the Modem Port.
- Select which type of phone line you have. Most phone lines these days use Tone.
- Click the right-arrow to continue.
Step 3: Enter Personal information
- In the first box, enter in the phone number to dial.
- If you are an Interchange user, enter in 604-822-1331
- If you are a Netinfo user, enter in 604-822-4477
- In the username box, enter in your Netinfo/Interchange username.
- Note: Your username is not the same as your e-mail address. If your e-mail address is username@interchange.ubc.ca, your username is username. Note also that usernames and passwords are case-sensitive.
- In the password box, enter in your password.
- Note: It is recommended you leave this box blank if others have access to your computer. Otherwise they can use up your hours.
- Click on the right-arrow to continue.
Step 4 : Configuring IP and DNS entries
- To answer the question Is there an IP Address for this configuration, select No.
- Click on the right-arrow to continue. The following window should appear:
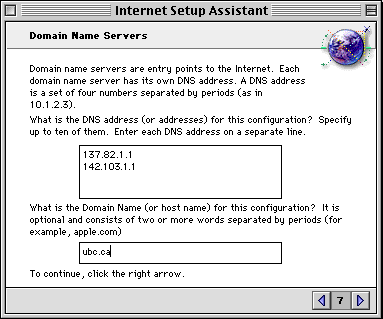
- In the first box for DNS addresses, enter in 137.82.1.1 on the first line and 142.103.1.1 on the second line as shown in the picture above.
- In the Domain Name box, enter in ubc.ca as shown in the picture above.
Step 5: Setting up your email and news
- Enter in your email address in the first box.
- Enter in username@interchange.ubc.ca, where username is your Netinfo/Interchange username.
- Enter your password in the second box. This is the same password as your login password.
- Note: It is recommended that you leave this box blank if others have access to your computer. Otherwise they can check your mail.
- Click on the right-arrow to continue.
- In the first box, enter in your pop account. This will be username@mail.interchange.ubc.ca, where username is replaced by your Netinfo/Interchange username. This is your incoming mail server information.
- In the second box, enter in smtp.interchange.ubc.ca. This is your outgoing mail server information.
- Click on the right-arrow to continue.
- Enter in the news (NNTP) server in the box provided. This server is news.interchange.ubc.ca
Step 6: Finishing Up
- You should now see a window similar to this:
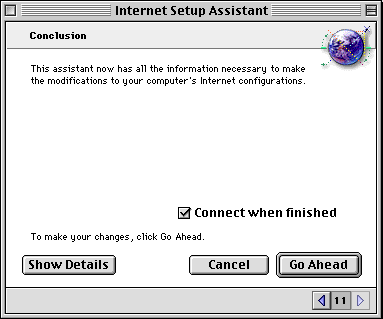
- Click on Show Details to review all the information you entered. Double-check to make sure there are no typos. Click on Go Ahead to save your configuration. If you do not wish to connect automatically to Interchange or Netinfo after saving, un-check Connect When Finished.
- To connect any other time, simply click on the Apple Internet Dialer, which is located in the Apple Menu. If you do not see it there, the Internet Dialer can also be found in the Internet folder of your hard drive.
Further Assistance
For additional technical support, please contact the IT Service Centre Help Desk .
When contacting the IT Service Centre Help Desk regarding problems with Dial-Up, please be ready to provide information such as:
- Your CWL username;
- Your operating system and version;
- The full text of any error messages that you receive.
