UBC IT offers two internet access services: Netinfo and Interchange. A Netinfo account is available free of cost to all current UBC students and allows twenty hours of dial-up PPP Internet access per month. Interchange accounts are available on a paid subscription basis to staff, faculty, students and alumni, as well as non-UBC customers.
This document explains how to set up a computer with Mac OS X for use with either Netinfo or Interchange.
Step 1: Open System Preferences
- Click on the System Preferences Icon at the bottom of the screen.

- In the System Preferences window, click on Network.
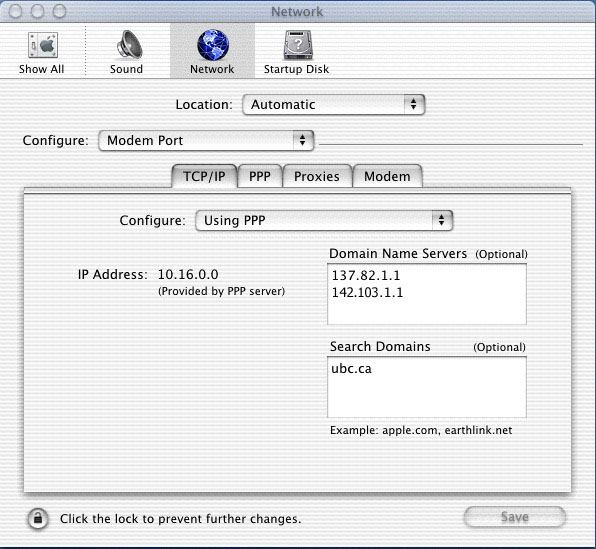
Step 2: Configure TCP/IP
- Pull down the first Configure menu near the top of the screen, and select Modem Port.
- Make sure that the TCP/IP tab is selected.
- Pull down the Configure menu in the TCP/IP window and select Using PPP.
- In the Domain Name Servers box, type in 137.82.1.1 on the first line and 142.103.1.1 on the second line.
- Under Search Domains type in: ubc.ca
- Click on the Save button.
Step 3: Configure PPP
- Click on the PPP tab (next to TCP/IP).

- Beside Service Provider, type Interchange or Netinfo (depending on what type of account you have.)
- Beside Telephone Number, enter the appropriate phone number:
- If you are a Netinfo user (student), enter in 604-822-4477
- If you are an Interchange user (paying customer), enter in 604-822-1331
- Beside Account Name, type in your Netinfo/Interchange user name.
- Note: Your user name is not the same as your e-mail address; if your e-mail address is username@interchange.ubc.ca, then your username is username. Note also that usernames and passwords are case-sensitive so please make sure that the CAPS LOCK is turned off.
- Beside Password, type in your Netinfo/Interchange password.
- Click on the Save button.
Step 4: Connecting to UBC Interchange/Netinfo
- To connect to UBC Interchange/Netinfo, double-click on your Hard Drive at the upper right of your desktop. Double click on Applications, then double-click on Internet Connect. When the Modem Port window appears, click on the Connect button.
- To disconnect, click on the Disconnect button.
- To simplify this procedure for the future, follow these steps:
- Double-click on your Hard Drive at the upper right of your desktop and then double-click on Applications.
- Highlight the Internet Connect icon by clicking on it only once.
- Click on the File pull down menu and select Make Alias. This will create a new file called Internet Connect Alias.
- Drag this file (Click and hold your mouse button on the file and move your mouse) to your Desktop. When you let go of the mouse button, it will place this icon on your desktop.
- You can now use this icon to connect to the Internet in the future.
Further Assistance
For additional technical support, please contact the IT Service Centre Help Desk .
When contacting the IT Service Centre Help Desk regarding problems with Dial-Up, please be ready to provide information such as:
- Your CWL username;
- Your operating system and version;
- The full text of any error messages that you receive.
