UBC IT offers two internet access services: Netinfo and Interchange. A Netinfo account is available free of cost to all current UBC students and allows twenty hours of dial-up PPP Internet access per month. Interchange accounts are available on a paid subscription basis to staff, faculty, students and alumni, as well as non-UBC customers.
This document explains how to set up MacPPP 2.x using MacTCP for use with either Netinfo or Interchange.
Important Note: For users running MacOS 7.5.3 and above, you may have Open Transport installed on your Macintosh. Open Transport TCP/IP replaces MacTCP and it is recommended that you use it in place of MacTCP. Please refer to the document Setting Up MacPPP 2.x with TCP/IP for UBC Interchange/Netinfo for further information.
Step 1: Selecting Your Dial-Up Client
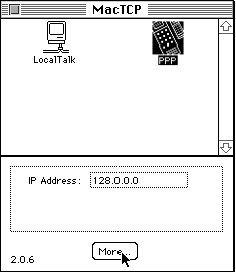
- From the Apple Menu, select Control Panels and choose MacTCP.
- Make sure the PPP icon is highlighted, and then click the More... button.
- Important Note: You can only have MacSLIP or MacPPP installed at any one time. If you see icons for both of them, you must uninstall one of them before you can use the internet. If you see an icon labelled SLIP, please refer to the document Setting up MacSLIP with MacTCP for UBC Interchange/Netinfo.
Step 2: Configuring Your MacTCP Settings
- You should now see the following screen :
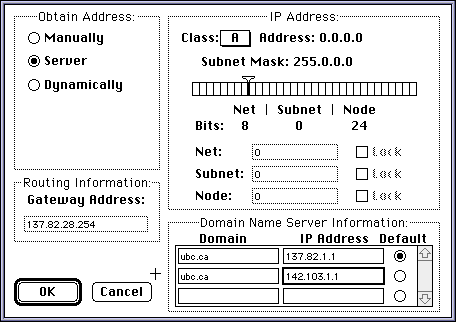
- In the Obtain Address section, select Server.
- In the Domain Name Server Information section, set the Domain to ubc.ca and the IP Address to 137.82.1.1 for the first entry. The Domain for the second entry should also be set to ubc.ca and the IP Address to 142.103.1.1. Under Default, bullet the the first entry, as shown above.
- Set the Class to A.
- Click OK to save your changes.
- Restart your Macintosh for the changes will take effect.
Step 3: Configuring MacPPP to Dial Interchange/Netinfo
- From the Apple menu, select Control Panels and choose Config PPP. The following window will appear:

- Click on the Config button. The following window will open:
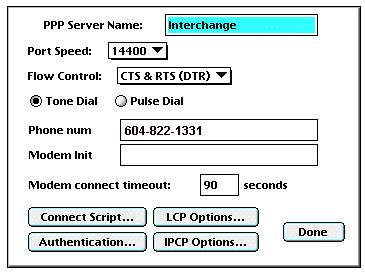
- Name the PPP Server:
- If you are a Netinfo user, the PPP Server Name should be Netinfo.
- If you are an Interchange user, the PPP Server Name should be Interchange.
- Set the Port Speed:
- If your modem speed is 14,400, choose 19200.
- If your modem speed is 28,800 or higher, choose 38400.
- Set the Phone Num:
- If you are an Interchange user, use 604-822-1331
- If you are a Netinfo user, use 604-822-4477
- For Modem Init, use the initialization string recommended by the manufacturer of your modem. This string should be in your modem manual. If all else fails, try AT &F or leave it blank.
Step 4: Entering Authentication Information
- Click on the Authentication button. The following screen will appear:
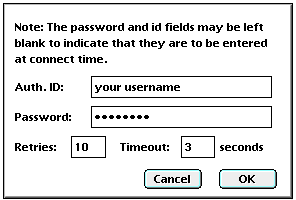
- For Auth. ID, enter your Netinfo/Interchange username.
- Note: Your username is not the same as your e-mail address; if your e-mail address is username@interchange.ubc.ca, then your username is username. Note also that usernames and passwords are case-sensitive.
- For Password, enter your password.
- Click OK to save this information.
- Click OK once more to return to the ConfigPPP Control Panel.
Step 5: Connecting to UBC Interchange/Netinfo
- From the Apple menu, select Control Panels and choose Config PPP.
- To connect to UBC Interchange/Netinfo, click Open.
- The modem will then dial Interchange/Netinfo. Once a modem connection has been established and you have been successfully authenticated, start a network application such as Netscape or Eudora.
- To disconnect, close all network applications; return to the Config PPP control panel and click the Close button.
Further Assistance
For additional technical support, please contact the IT Service Centre Help Desk .
When contacting the IT Service Centre Help Desk regarding problems with Dial-Up, please be ready to provide information such as:
- Your CWL username;
- Your operating system and version;
- The full text of any error messages that you receive.
