UBC IT offers two internet access services: Netinfo and Interchange. A Netinfo account is available free of cost to all current UBC students and allows twenty hours of dial-up PPP Internet access per month. Interchange accounts are available on a paid subscription basis to staff, faculty, students and alumni, as well as non-UBC customers.
This document explains how to set up MacPPP 2.x using MacTCP for use with either Netinfo or Interchange.
Step 1: Configuring Open Transport TCP/IP
- From the Apple menu, select Control Panels.
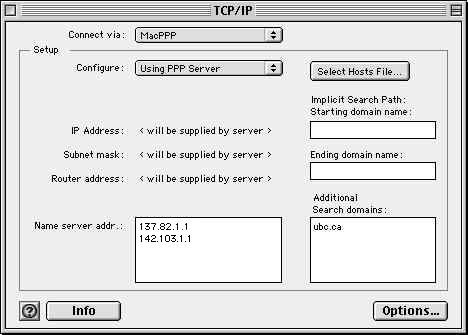
- Open the TCP/IP control panel.

- Set Connect via to MacPPP and Configure to Using PPP.
- IP address, Router address and Subnet mask should all look like this: >
- For Name server addr, enter 137.82.1.1 and 142.103.1.1 (one set of numbers on each line).
- For Additional search domains, enter ubc.ca
- Note: If you have a field called Starting Domain Name as shown on the screenshot above, type in ubc.ca in the space provided. Some versions of Open Transport TCP/IP do no include the Starting and Ending Domain Name fields.
- Close the window and confirm that you wish to save changes.
- You should now restart your computer.
Step 2: Configuring MacPPP to Dial Interchange/Netinfo
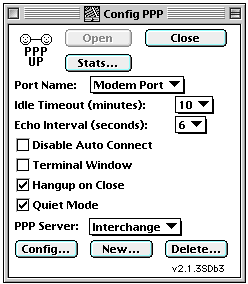
- From the Apple menu, select Control Panels and choose Config PPP. The following window will appear:

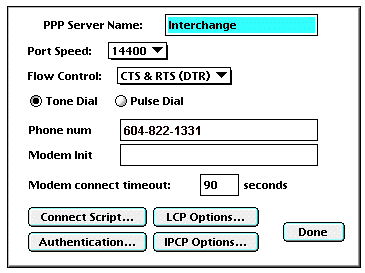
- Click on the Config button. The following window will open:

- Name the PPP Server:
- If you are a Netinfo user, the PPP Server Name should be Netinfo.
- If you are an Interchange user, the PPP Server Name should be Interchange.
- Set the Port Speed:
- If your modem speed is 14,400, choose 19200.
- If your modem speed is 28,800 or higher, choose 38400.
- Set the Phone Num:
- If you are an Interchange user, use 604-822-1331
- If you are a Netinfo user, use 604-822-4477
- For Modem Init, use the initialization string recommended by the manufacturer of your modem. This string should be in your modem manual. If all else fails, try AT &F or leave it blank.
Step 3: Entering Authentication Information
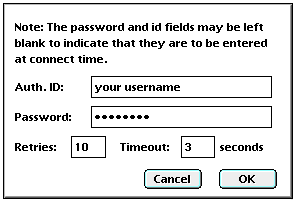
- Click on the Authentication button. The following screen will appear:

- For Auth. ID, enter your Netinfo/Interchange username.
- Note: Your username is not the same as your e-mail address; if your e-mail address is username@interchange.ubc.ca, then your username is username. Note also that usernames and passwords are case-sensitive.
- For Password, enter your password.
- Click OK to save this information.
- Click OK once more to return to the ConfigPPP Control Panel.
Step 4: Connecting to UBC Interchange/Netinfo
- From the Apple menu, select Control Panels and choose Config PPP.
- To connect to UBC Interchange/Netinfo, click Open.
- The modem will then dial Interchange/Netinfo. Once a modem connection has been established and you have been successfully authenticated, start a network application such as Netscape or Eudora.
- To disconnect, close all network applications; return to the Config PPP control panel and click the Close button.
Further Assistance
For additional technical support, please contact the IT Service Centre Help Desk .
When contacting the IT Service Centre Help Desk regarding problems with Dial-Up, please be ready to provide information such as:
- Your CWL username;
- Your operating system and version;
- The full text of any error messages that you receive.
