UBC IT offers two internet access services: Netinfo and Interchange. A Netinfo account is available free of cost to all current UBC students and allows twenty hours of dial-up PPP Internet access per month. Interchange accounts are available on a paid subscription basis to staff, faculty, students and alumni, as well as non-UBC customers.
This document explains how to set up MacSLIP with MacTCP for use with either Netinfo or Interchange.
Step 1: Configuring Open Transport TCP/IP
- From the Apple menu, select Control Panels.
- Open the TCP/IP control panel.
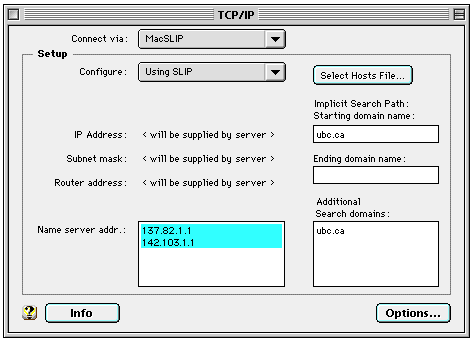
- Set Connect via to MacSLIP and Configure to Using SLIP.
- IP address, Router address and Subnet mask should all look like this: >
- For Name server addr, enter 137.82.1.1 and 142.103.1.1 (one set of numbers on each line.)
- For Additional search domains, enter ubc.ca
- Note: If you have a field called Starting Domain Name as shown on the screenshot above, type in ubc.ca in the space provided. Some versions of Open Transport TCP/IP do no include the Starting and Ending Domain Name fields.
- Close the window and confirm that you wish to save changes.
- You should now restart your computer.
Step 2: Editing the MacSLIP Configuration
- From the Apple menu, select Control Panels and choose MacSLIP.
- The following window will appear:
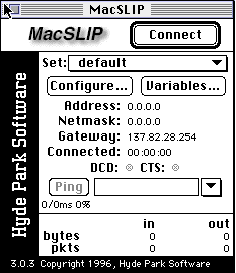
- Click the Configure... button to bring up the following window:
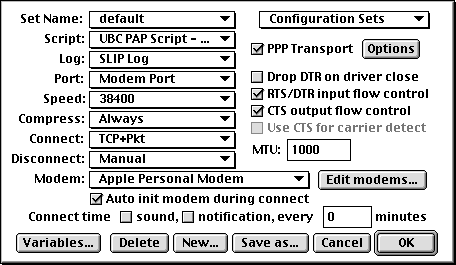
Step 3: Creating a New Set
- To create a new set, click New.... You will be presented with the following dialog box :

- Name the Set:
- If you are a Netinfo user, call it Netinfo, then click on OK.
- If you are an Interchange user, call it Interchange, then click on OK.
- Pull down the Script menu, by clicking on the down arrow. Select Set. Locate the UBC PAP Script (normally in the System/Preferences/MacSLIP folder), highlight it and click Open to select it :
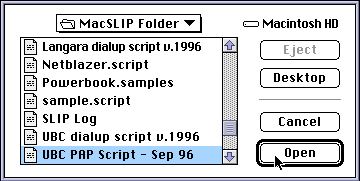
- If the UBC PAP Script is not in the MacSLIP Folder, copy it from Disk One of our Macintosh Startup Kit to the System/Preferences/MacSLIP folder and then repeat step 3.
- Pull down the Port menu and select the port to which your modem is connected (usually Modem Port.)
- Pull down the Speed menu to select your modem speed.
- If your modem speed is 14,400, select 19200.
- If your modem speed is 28,800 or higher, 38400.
- Note: Some older Macintoshes, such as the Mac IIsi cannot connect at speeds greater than 19200.
- Set Compress to Always.
- Under Connect, select both Connect when MacTCP is Opened and Connect on Packet Activity (TCP + Pkt).
- Under Disconnect, select Disconnect After 15 minutes, though you can set this to a shorter interval if you prefer. This setting prevents you from accidentally leaving yourself connected and using up dial-up time.
- Under Modem, select your modem from the list provided. If your modem is not listed, you should create a custom initialization string by clicking Edit Modems.... Enter the name of your modem and copy the initialization string exactly as it reads on your modem manual.
- Ensure that PPP Transport has a checkmark in the box beside it.
- Set the MTU to 1000.
- Place a check in the boxes beside RTS/DTR input flow control and CTS output flow control. If these settings result in an error message when dialing in, uncheck these boxes.
Step 4: Setting Authentication Information
- In the main Configure screen, click the Options button beside PPP Transport.
- The following dialog box will appear :
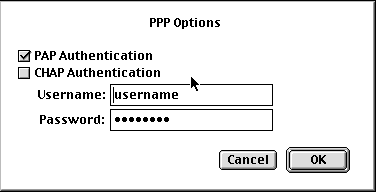
- Place a checkmark in the box beside PAP Authentication.
- Enter your Netinfo/Interchange username in the Username field and your password in the Password field.
- Note: Your username is not the same as your e-mail address; if your e-mail address is username@interchange.ubc.ca, then your username is username. Note also that usernames and passwords are case-sensitive.
- Click OK to return to the main Configure menu.
- Save your settings by clicking the Save button.
Step 5: Changing the Phone Number
- Click on the Variables button.
- If there is no phone number listed in the window, click on the Add button. Type Phone in the Variable box and click OK and then type in the phone number in the Value box (604-822-1331 for Interchange and 604-822-4477 for Netinfo.)
- If you have the wrong phone number in the box, highlight the entry, click on the Edit button and change the Value to 604-822-1331 for Interchange or 604-822-4477 for Netinfo.
- You should only see one entry with a phone number in it. If there is more than one, highlight the extra line(s) and click on Remove.
- If everything seems to be setup correctly then click on Save.
Step 6: Connecting to UBC Interchange/Netinfo
- To connect to UBC Interchange/Netinfo, bring up the MacSLIP Control Panel and click the Connect button, or pull down the MacSLIP menu, located in the right hand corner of the screen, and choose Connect.
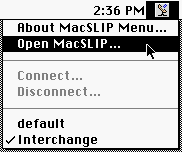
- The modem will now dial and you will connect to Interchange/Netinfo.
- To disconnect from Interchange/Netinfo, pull down the MacSLIP menu and choose Disconnect. The modem will then hang up.
Further Assistance
For additional technical support, please contact the IT Service Centre Help Desk .
When contacting the IT Service Centre Help Desk regarding problems with Dial-Up, please be ready to provide information such as:
- Your CWL username;
- Your operating system and version;
- The full text of any error messages that you receive.
