This document explains how to set up OS/2 Warp 4.0 IBM Dial-Up for use with either Netinfo or Interchange.
Please Note: OS/2 is not supported by the IT Service Centre Help Desk. This document is provided only as a convenience to our OS/2 users.
- In IBM Dial-Up for TCP/IP, create a new entry by clicking Add Entry.
- The following screen will appear:
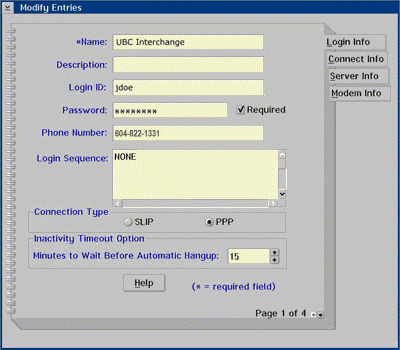
- In the Name field, enter Netinfo if you are a Netinfo user or Interchange if you are an Interchange customer.
- In the Login ID field, enter your Interchange/Netinfo username.
- In the Password field, enter your password.
- Place a checkmark in the Required box.
- In the Phone number field, enter 604-822-4477 if you are a Netinfo user; 604-822-1331 if you have an Interchange account.
- Set Login Sequence to NONE.
- Set Connection Type to PPP.
Step 2: Configuring Connect Info
- Click on the Connect Info tab. The following screen will appear:
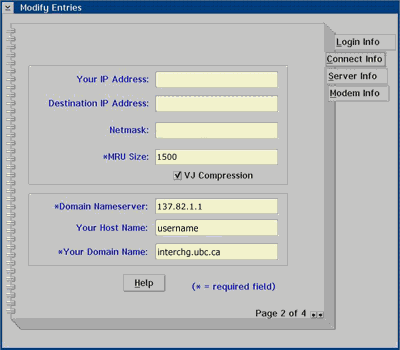
- Leave Your IP Address, Destination IP Address and Netmask blank.
- Set MRU Size to 1500.
- Place a checkmark in the box beside VJ Compression.
- Set Domain Nameserver to 137.82.1.1
- Set Your Host Name to your Netinfo/Interchange username.
- Set Your Domain Name to interchange.ubc.ca
Step 3: Configuring Server Info
- Click on the Server Info tab. The following screen will appear:
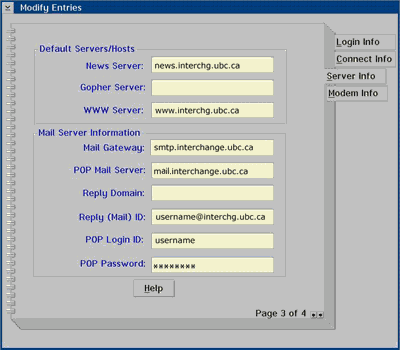
- Set News Server to news.interchange.ubc.ca
- Set WWW Server to www.interchange.ubc.ca
- Set Mail Gateway to smtp.interchange.ubc.ca
- Set POP Mail Server to pop.interchange.ubc.ca
- Set Reply (Mail) ID to your e-mail address.
- Set POP Login ID to your Netinfo/Interchange username.
- Set POP Password to your password.
Step 4: Configuring Your Modem
- Click on the Modem Info tab.
- The following screen should appear:
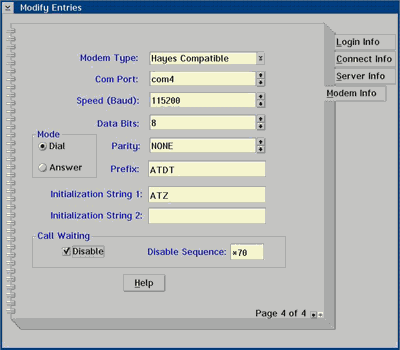
- Set Modem Type to the model of your modem. Use Hayes Compatible if your modem is not listed.
- Set Com Port to the communications port which your modem is currently using.
- Most modems tend to use com2.
- Set Speed (Baud) to the fastest speed your modem supports.
- Set Data Bits to 8.
- Set Mode to Dial.
- Set Parity to NONE.
- Set Prefix to ATDT for tone dial; ATDP for pulse dial.
- Set Initialization String 1 to the initialization string recommended by the manufacturer of your modem. This string should be in your modem manual. If you cannot find a suitable string, try ATZ or AT&F.
Further Assistance
For additional technical support, please contact the IT Service Centre Help Desk .
When contacting the IT Service Centre Help Desk regarding problems with Dial-Up, please be ready to provide information such as:
- Your CWL username;
- Your operating system and version;
- The full text of any error messages that you receive.
