UBC IT offers two Internet access services: Netinfo and Interchange. A Netinfo account is available free of cost to all current UBC students and allows twenty hours of Internet access per month. Interchange accounts are available on a paid subscription basis to staff, faculty, students and alumni, as well as non-UBC customers. 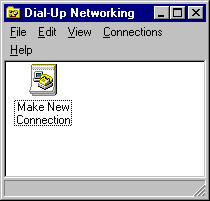
This document explains how to set up Windows ME Dial-Up Networking for use with either Netinfo or Interchange.
Important Note: This document assumes that your computer is a stand-alone computer unconnected to a Local Area Network (LAN). If you are connected to a LAN, following the steps outlined below could cause you to lose connectivity to the network so contact your LAN Administrator for assistance.
Before starting, ensure you have the original Windows ME CD available.
Step 1: Installing a Modem
- Click on the Start button, usually located in the lower left hand corner of the screen.
- From the Start menu, select Settings and choose Control Panel .
- In the Control Panel , double click the Modems icon.

- If your modem is already installed, you should see it listed here. If this is the case, skip to Step 2.
- If you have not already installed your modem, click Add , and the Install New Modem Wizard should appear. Click Next to install the modem automatically. If you wish to install the modem manually, click the box marked Don't detect my modem?. If you choose to do a manual installation, you will need to know the manufacturer and model of your modem, as well as the COM port which the modem is using. If all else fails, try Standard 28800 or Standard 14400 and the COM port is usually set to COM 2 .
Step 2: Installing Dial-Up Networking
- Click on the Start button, usually located in the lower left hand corner of the screen.
- From the Start menu, select Settings and choose Control Panel .
- In the Control Panel , double click the Add/Remove New Programs icon.
- Click on the Windows Setup tab and double click on Communications .
- Ensure there is a check in the box beside Dial-Up Networking .
- Click Ok to close this window and then Ok again to save your changes. If asked to restart your computer, click No .
Step 3: Installing TCP/IP and Dial-Up Adapter
- In the Control Panel , double click on the Network icon.

- If TCP/IP is not listed under installed network components.
- Click Add to add a network component and select Protocol . Click Add .
- Under Manufacturers , select Microsoft . Under Network Protocols , select TCP/IP .
- Click Ok to install. If asked to restart your computer, click No .
- If TCP/IP is installed, ensure there is only one copy. Remove any extra copies.
- If Client for Netware Networks is installed, highlight it and click Remove .
- If NetBEUI or IPX/SPX-compatible Protocol are listed under installed network components, click Remove to remove them.
- If File and Printer Sharing for Microsoft Networks is installed, highlight it and click Remove .
- If TCP/IP is not listed under installed network components.
- In the Primary Network Logon option box, click on the arrow on the far right. Select Windows Logon from the dropdown menu.
- Highlight TCP/IP and click Properties . Select the IP Address tab and choose Obtain IP Address Automatically . Click Ok .
- Your Network Control Panel should now look like the following:
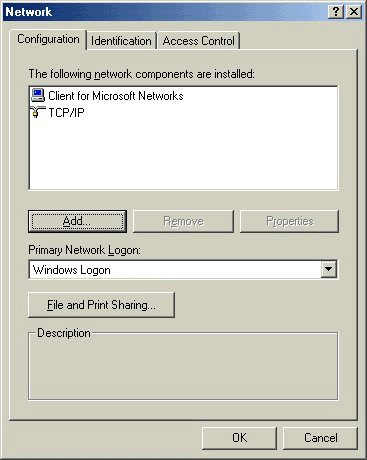
- Note: You may also have Dial-Up Adapter listed. This component is needed in order to dial up to Interchange and Netinfo. If it is missing, it will be installed automatically in Step 4 .
- Click Ok once more. Windows ME may prompt you to insert your Windows ME CD and will copy the necessary files.
- When asked to restart your computer, click Yes .
Step 4: Configuring Dial-Up Networking
- On the desktop, double click the icon called My Computer .
- In the My Computer folder, double click the icon called Control Panel .
- Double click Dial-Up Networking icon.
- Double click Make New Connection to create a new Dial-Up Networking connection icon.
-
- If you are a Netinfo user, name the computer you are dialing Netinfo . Click Next . Leave the Area code box empty. For Telephone Number , enter 604-822-4477 . Set the Country Code to Canada (1).
- If you are an Interchange user, name the computer you are dialing Interchange . Click Next . Leave the Area code box empty. For Telephone Number , enter 604-822-1331 . Set the Country Code to Canada (1).
- Click Next and then Finish .
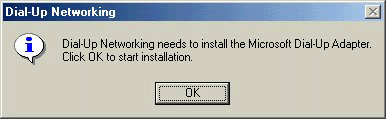
- If you don't have a Dial-Up Adapter installed in the Network control panel, WinME will install it for you automatically. Click on OK to have WinME install the Dial-Up Adapter for you. If this window doesn't appear for you, ignore this step and proceed.
?
- Highlight the connection icon you just created by clicking on it once. From the File menu, select Properties .
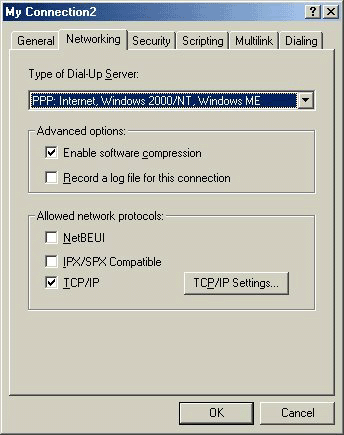
- Click on the tab labelled Networking .
Important Note: If you do not see a tab labelled Networking , look near the top of the window; you should see three or four tabs. Click on the Networking tab. - Only Enable software compression and TCP/IP should be checked. If there are any other boxes checked, click on the box to uncheck them.
- Your window should now look like the following:
- Click Ok to exit this window. Click Ok again to save your changes.
Step 5: Connecting to UBC Interchange/Netinfo
- On the desktop, click the icon called My Computer .
- Double click the icon Dial-Up Networking .
- Double click on the icon you created in the previous step. Enter your username and password in the appropriate fields and click Connect .
- Note: Your username is not the same as your e-mail address; if your e-mail address is jdoe@interchange.ubc.ca , then your username is jdoe . Note also that usernames and passwords are case-sensitive.
-
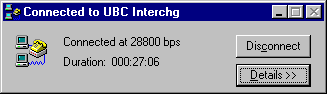
- After you have successfully connected to UBC Interchange/Netinfo, a box labelled Connected to Interchange or Connected to Netinfo will appear.
- Minimize this box and start network applications such as Netscape or Eudora. Newer versions of Windows ME will minimize this window automatically, and a new phone icon should appear in your System Tray (The indented area on the right-hand side of the taskbar .)
- To disconnect, first close all network applications (except offline newsreaders or mail readers); restore the Connected To box by double-clicking on the phone icon in the System Tray ; and click Disconnect .
Further Assistance
For additional technical support, please contact the IT Service Centre Help Desk .
When contacting the IT Service Centre Help Desk regarding problems with Dial-Up, please be ready to provide information such as:
- Your CWL username;
- Your operating system and version;
- The full text of any error messages that you receive.
