UBC IT offers two internet access services: Netinfo and Interchange. A Netinfo account is available free of cost to all current UBC students and allows twenty hours of Internet access per month. Interchange accounts are available on a paid subscription basis to staff, faculty, students and alumni, as well as non-UBC customers.
This document explains how to set up Windows 2000 Dial-Up Networking for use with either Netinfo or Interchange.
Before starting, ensure you have the original Windows 2000 CD available. This document assumes that you are not connected to a Local Area Network (LAN).
Step 1: Installing a Modem
To install a new modem:
- From the Start menu, choose Settings then click on Control Panel. Then select Phone and Modem Options.
- You may be prompted to select your Country, Area Code and the number you should use to access an outside line (if necessary.) This will only appear if you are setting your modem up for the first time. Type in the appropriate information and click on Next.
- Select the Modems tab. If there is a modem listed under the list of installed modems, click on Cancel and proceed to the next section. If there is no modem listed then click on Add.
- If you know what type of modem you have, put a checkmark in the box next to Don't detect my modem; I will select it from a list and click on Next. You then have a choice:
- You can use the drivers that Windows provides: Choose your modem Manufacturer from the list on the left; and then the appropriate model from the list on the right.
- or you can use drivers provided by your modem manufacturer: Click on Have Disk and specify the path to the installation files.
- If you are unsure about the type of modem you have, press Next without selecting Don't detect my modem; I will select it from a list. Windows will then attempt to auto-detect your hardware. This may take a while but it will present you with a list of modems. Select the one that best describes your modem.
- Select the Com Port to use with your modem. In most cases, there will be only one port listed; click on it so that it is highlighted, and click on Next.
- Click Finish, and this completes the configuration of your modem.
- You should now see your modem displayed in the list of modems installed. There should only be this one modem listed. Click OK to close the Phone and Modem Options window.
Step 2: Configure Dial-Up Networking (DUN)
- From the Start Menu, click on Settings, then click on Control Panel.
- Choose Network and Dial-Up Connections by double clicking on the icon.
- Double click on Make New Connection and click Next.
- Select Dial Up to the Internet and click Next.
- Select I want to configure my connection manually and click Next.
- Select I connect through a phone line and modem and click Next.
- Enter the phone number
- For Netinfo, enter 604-822-4477
- For Interchange, enter 604-822-1331
- Note: Leave the Area code box empty.
- Select the country code: Canada (1) and click Next.
- Enter your Netinfo/Interchange username and password and click Next.
- Note: Your username is not the same as your e-mail address; if your e-mail address is jdoe@interchange.ubc.ca, then your username is jdoe. Note also that usernames and passwords are case-sensitive so make sure that your CAPS LOCK key is turned off.
- Enter a connection name for your connection. You can name it anything that you want. This is just a label, but should be descriptive like Connection to Netinfo or Connection to 604-822-1331. Use something that you will be able to recognize when you want to connect. Click Next.
- You will be asked if you want to set up an Internet Mail account. If you have another mail reader, like Eudora, Netscape Mail, or Outlook then choose no, and click on Next, then Finish. If you want to set up Outlook Express at this time, please refer to the Setting Up Outlook Express (PC) document for UBC Interchange/Netinfo.
- Deselect the box asking if you want to connect immediately unless you do want to connect. Click on Finish.
Step 3: Modify an Existing Dial-Up Networking (DUN) Connection
Now check that all the settings have been automatically configured properly.
- From the Start menu, choose Settings then click on Control Panel.
- Double click on Network and Dial-Up Connections.
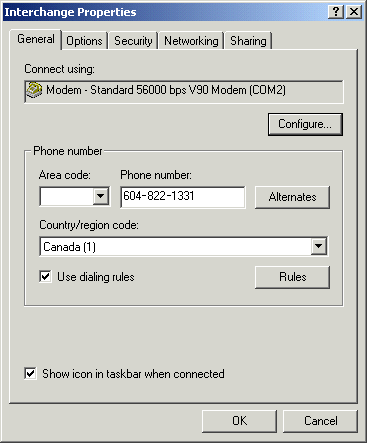
- Right-click on the appropriate connection icon and select Properties to get the following screen:

- Check that all the displayed information is correct.
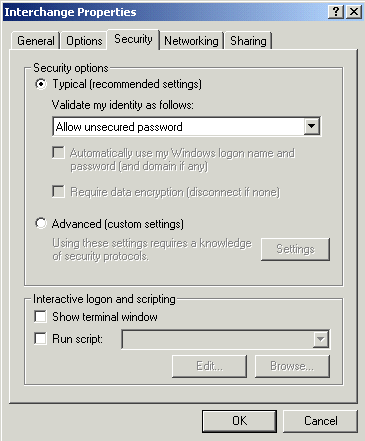
- Click on the Security tab, and change any settings so that it looks like the following. This information should be set correctly by default:

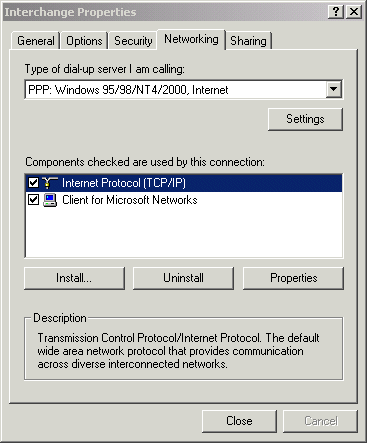
- Select the Networking tab. Make sure the pull down menu at the top of the screen is set to PPP, and that Internet Protocol (TCP/IP) and Client for MS Networks are listed and checked in the box below. You may see other components listed in this box. For the most part, these can be ignored. Select TCP/IP and click on Properties to bring up the second window. Make sure both the IP address and DNS server address are set to obtain information automatically. Click OK and go back to the Network and Dial-Up Connections window.

- If you would like to put a shortcut on your Desktop, click on the connection icon and drag it to your desktop. You will be asked if you want to create a shortcut; click Yes.
- You can now close both the Network and Dial-up Connections and the Control Panel windows.
Step 4: Connect to the Internet
- If you made a shortcut to your connection icon in the previous section, double click on it to connect to the internet.
- If you did not make a shortcut, you will have to bring up the Network and Dial-up Connections window to connect. From the Start menu, choose Settings then click on Control Panel. Choose Network and DUN Connections from the Control Panel, then double click on the connection icon.
- Your username and password should be displayed as you entered them earlier. To not have to enter your password every time you want to connect, click on Save Password.
- Note: You will see your password in the form of asterisks (****). To increase security, the number of asterisks displays does not correspond to the number of characters in your password.
- Click on Dial to connect.
- An icon will appear in the system tray if you have selected Show icon in taskbar when connected in the General tab, under Properties. Use this icon to disconnect from the Netinfo/Interchange service.
Further Assistance
For additional technical support, please contact the IT Service Centre Help Desk .
When contacting the IT Service Centre Help Desk regarding problems with Dial-Up, please be ready to provide information such as:
- Your CWL username;
- Your operating system and version;
- The full text of any error messages that you receive.
