UBC IT offers two Internet access services: Netinfo and Interchange. A Netinfo account is available free of cost to all current UBC students and allows twenty hours of Internet access per month. Interchange accounts are available on a paid subscription basis to staff, faculty, students and alumni, as well as non-UBC customers.
This document explains how to set up Windows XP Dial-Up Networking for use with either Netinfo or Interchange.
Before You Begin
Before starting, ensure you have the original Windows XP CD available. If your computer came with Windows pre-installed, the Windows setup files may be located on your computer. If you do not have your original media and you do not have the Windows XP setup files on your hard disk, contact your computers vendor.
Windows XP can be configured so that it looks and feels like Windows 2000. This may affect where the various options (such as the Control Panel) are located. The instructions below are designed for Windows XP using the default look and feel.
This document assumes that you are not connected to a Local Area Network (LAN).
Step 1: Verifying Modem Installation and Driver Information
- Click on the Start button, then click on Control Panel.
- Select the Printers and Other Hardware category, then select Phone and Modem Options.
- Click on the Modems tab. You should see a modem in the modem list.
- If there is no modem listed, click Add and the New Hardware Wizard should appear. Click Next to install the modem automatically. If you wish to install the modem manually, click the box marked Don't detect my modem? If you choose to do a manual installation, you will need to know the manufacturer and model of your modem, as well as the COM port which the modem is using. If all else fails, try Standard 57600 or Standard 28800 and the COM port is usually set to COM 2. If you have the driver disk for your modem, you may also use that by clicking on the Have Disk option after choosing to select your modem from a list. Once you have selected the appropriate driver and com port, click Finish. There should now be a modem in the list.
- Click on the modem in the list once to highlight it and click on the Properties button. This will open a Modem Properties dialog box.
- Verify that the device status says, "This Device Is Working Properly" under the General Tab. If any error exists do not proceed until the error has been corrected and the modem is working properly. You may have to reinstall your modem driver if the device is not working properly.
- Click on the Driver tab at the top of the Modem Properties dialog box and verify that the driver date is reasonably current (Usually not older than 12 to 18 months old). Once proper modem installation and configuration has been confirmed move on to Step 2.
Step 2: Configuring Network and Internet Connections
- Click on the Start button, Click on Control Panel.
- Select the Network and Internet Connections category, then Click on Network Connections Icon.
- Click on Create New Connection, located in the Network Tasks Menu on the left hand side of your screen.
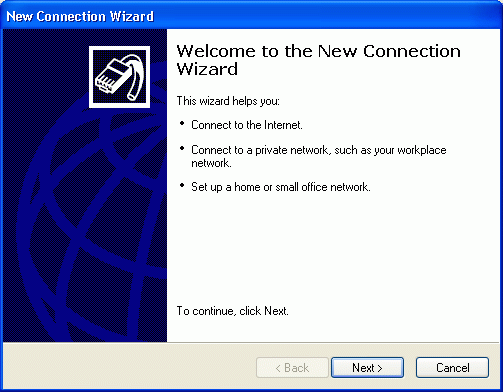
- This should bring up the New Connection Wizard which will be used to configure a new connection. Click on the Next button.
- Select the Connect to the Internet option, followed by clicking on the Next button.

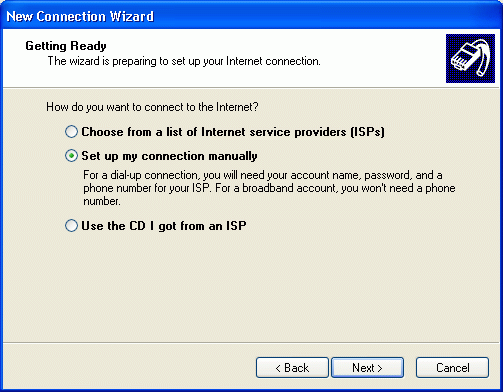
- Select the Set up my connection manually option, then click on the Next button.
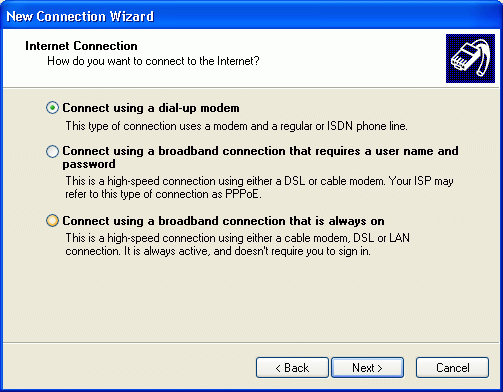
- Select the Connect using a dial-up modem option, then click on the Next button.
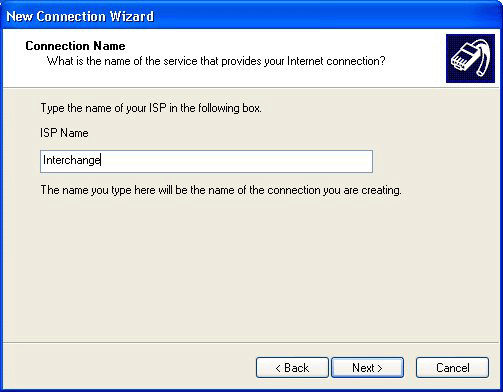
- It will now ask you to name the connection.
- If you want to connect to Netinfo, type in Netinfo in the ISP Name field, then click on the Next button.
- If you want to connect to Interchange, type in Interchange in the ISP Name field, then click on the Next button.
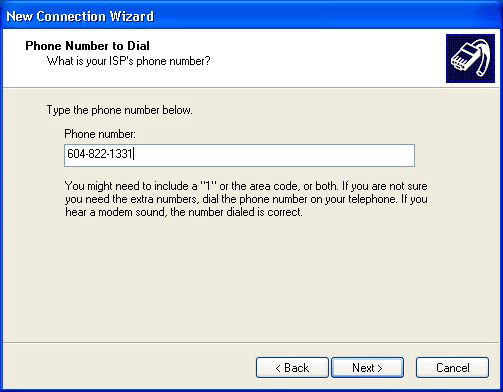
- Enter the appropriate phone number for Netinfo or Interchange.
- For Interchange and Alumni accounts, enter 604-822-1331, then click on the Next button.
- For Netinfo accounts, enter 604-822-4477, then click on the Next button.
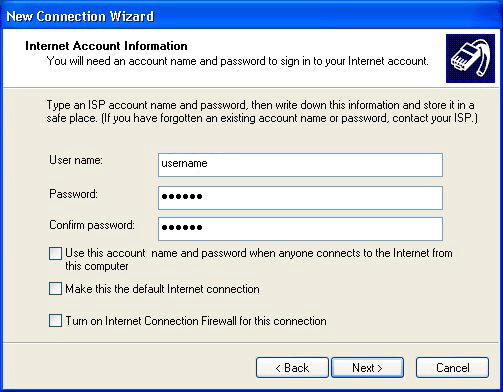
- Enter your account user name and password, then click on the Next button.
- Enter your username which is the first part of your Netinfo/Interchange email address before the "@" symbol. For example, if your email address is username@interchange.ubc.ca, then your user name is just username.
- Enter your password in the Password and Confirm password fields.
- Keep in mind that usernames and password are case sensitive so make sure that the CAPS LOCK is turned off.
- Remove the three green checkmarks that are located at the bottom before you click on Next.
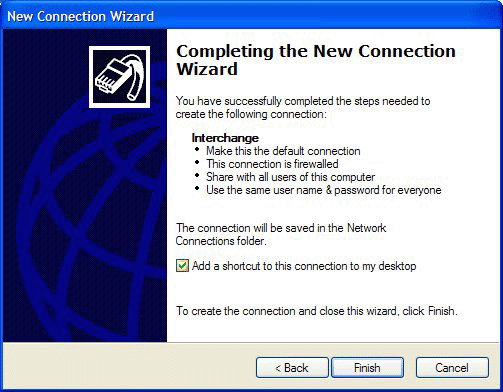
- If you would like to have a shortcut placed on your desktop for this connection, select the Add a shortcut to this connection to my desktop option, then click on the Finish button.
Step 3: Connecting to the Internet
- Windows XP should automatically bring up the Connect To Interchange window with the username, Click on Dial.
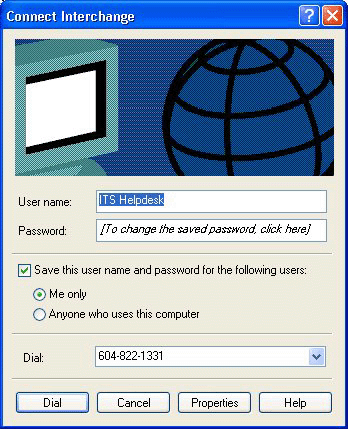
- After Finishing with the Connection Wizard, a new icon should have appeared on the desktop if you selected that option.
- If it is not on your desktop, you can find it by clicking on Start, then by highlighting Connect To and selecting Netinfo or Interchange. This will bring up the Internet connection window seen above.
Further Assistance
For additional technical support, please contact the IT Service Centre Help Desk .
When contacting the IT Service Centre Help Desk regarding problems with Dial-Up, please be ready to provide information such as:
- Your CWL username;
- Your operating system and version;
- The full text of any error messages that you receive.
