This document explains how to set up RedHat Linux 7.3 for use with either Netinfo or Interchange. RedHat Linux 7.3 is not a supported platform for Netinfo/Interchange.
Step 1: Setting up the connection
- Start the Network Configuration utility.
- If you're using the GNOME Desktop Environment, select:
- Main Menu
- Programs
- System
- Network Configuration
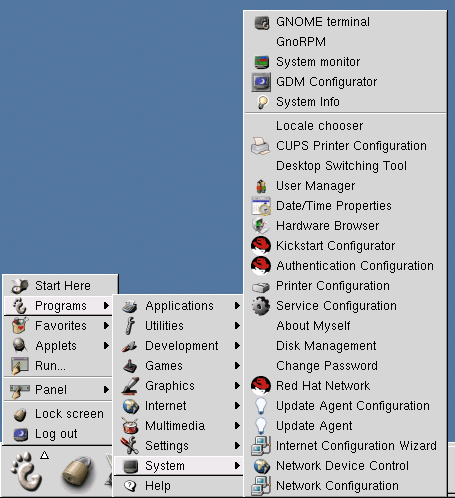
- If you're using the K Desktop Environment, select:
- Main Menu
- System
- Network Configuration
- If you're using the GNOME Desktop Environment, select:
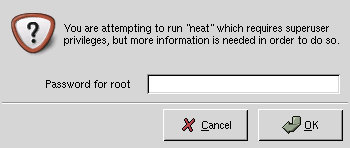
- If a window appears asking for the root user's password, type it in then press .
- You should now see the Network Configuration window:
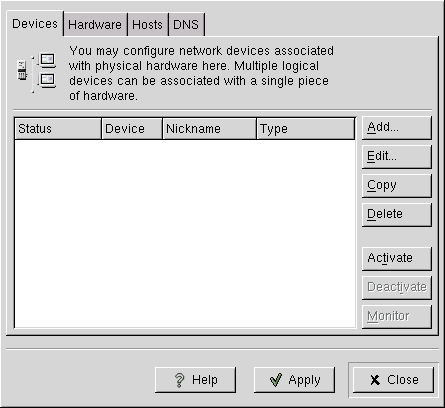
- Select the Hardware tab.
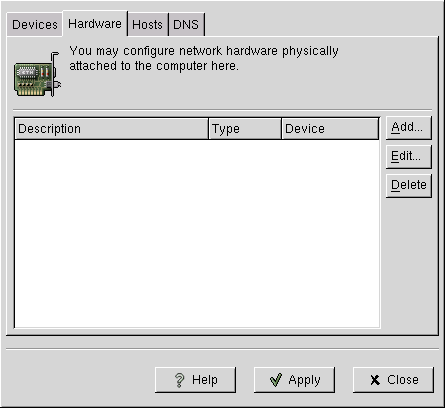
- If your modem does not appear in the window:
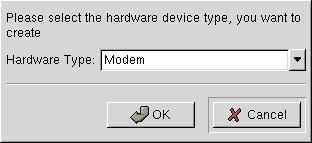
- Click on the Add... button.
- Select Modem from the drop-down menu, and click OK .
- Enter the appropriate information for your modem.
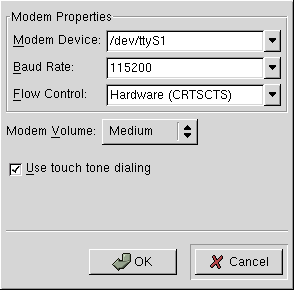
- Modems are most commonly found on /dev/ttyS1.
- Most modems can use the 115200 Baud Rate setting, but older ones must use the 38400 Baud Rate setting.
- Flow Control should be set to Hardware.
- Put a check mark next to Use touch tone dialing unless your telephone line must use pulse dialing.
- Click the OK button.
- Click the Devices tab.

- Click the Add... button.
- Choose Modem Connection and click Next .

- Enter the requested information.
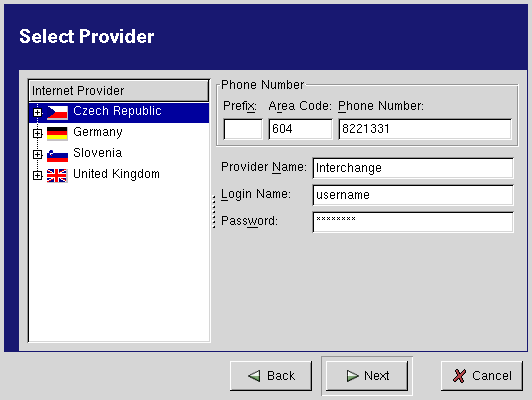
- Enter the area code and telephone number for Netinfo/Interchange.
- If you are a Netinfo user, enter 604 for the Area Code and 8224477 for the Phone Number.
- If you are an Interchange user, enter 604 for the Area Code and 8221331 for the Phone Number.
- Enter Netinfo or Interchange for the Provider Name.
- Enter your Netinfo/Interchange username for the Login Name.
- Note: Your username is not the same as your e-mail address; if your e-mail address is username@interchange.ubc.ca , then your username is username . Note also that usernames and passwords are case-sensitive.
- Enter your Netinfo/Interchange password, then click Next .
- Click Finish to accept the information and close this window.
- Click Apply then Close to save your changes.
Step 2: Connecting to the Internet
- Start the Network Device Control utility.
- If you're using the GNOME Desktop Environment, select:
- Main Menu
- Programs
- System
- Network Device Control
- If you're using the K Desktop Environment, select:
- Main Menu
- System
- Network Device Control
- If you're using the GNOME Desktop Environment, select:
- You should now see the Network Device Control window:
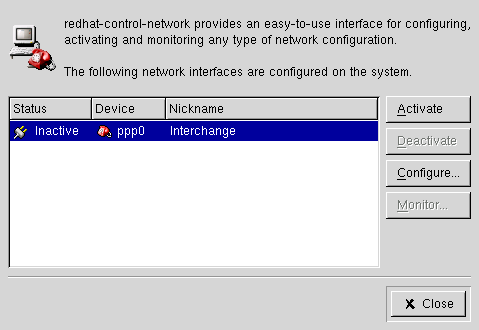
- Click on the Netinfo or Interchange selection, then click Activate .
- Your modem should begin dialing Netinfo or Interchange.
- When the Status column reads Active, you are connected to the Internet.
- To disconnect, click on the Netinfo or Interchange selection, then click Deactivate .
Further Assistance
For additional technical support, please contact the IT Service Centre Help Desk .
When contacting the IT Service Centre Help Desk regarding problems with Dial-Up, please be ready to provide information such as:
- Your CWL username;
- Your operating system and version;
- The full text of any error messages that you receive.
