Step 1: Starting Windows 3.x Terminal
- Open Program Manager.
- Look for the Accessories folder, then open it.
- Locate Terminal and open it.
Step 2: Setting Up the Communications
- Go to the Settings menu at the top of the window.
- Select Communications from the pull down menu.
- In the Communications menu, setup the following:
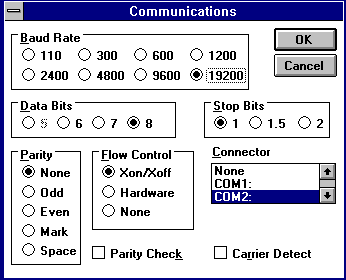
- In the Connector section, set the COM port.? Choose from COM1 to COM4.? An Error message will appear if the wrong COM port is chosen. (COM2 is the most common port used)
- In the Baud Rate section, set it to 19200 (or the highest available).
- When finished with these changes.? Click OK to save changes.
- Go into the Settings menu again and this time select Terminal Preferences
- Make sure that the box beside Use Function, Arrow, and Ctrl Keys for Windows at the bottom of the window is unchecked.
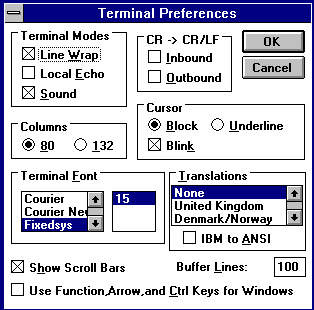
- Click OK when finished.? Now that this is done, dialing up will be the next step.
- Make sure that the box beside Use Function, Arrow, and Ctrl Keys for Windows at the bottom of the window is unchecked.
Step 3: Setting Up Interchange/Netinfo phone numbers
- Once again pull down Settings from the menu bar.
- Select Phone Number this time.
- This is where the Interchange or Netinfo number is entered.? In the open space beside Dial, enter the appropriate phone number.? To connect to Interchange, enter 604-822-1331.? To connect to Netinfo, enter 604-822-4477.

- Click OK when phone number has been entered.
Step 4: Saving the Connection Information
- Go to the File menu at the top of the Windows Terminal Window.
- Select Save As.
- Now name the connection either netinfo.trm or interchg.trm in the blank space under File Name.? (If you are setting up a connection to Netinfo, save it as netinfo.trm.? If you are setting up a connection to Interchange, save it as interchg.trm)
- Click OK to save the connection information.
Step 5: Connecting to Interchange/Netinfo
- Go to the Phone menu as shown below.
- Select Dial.
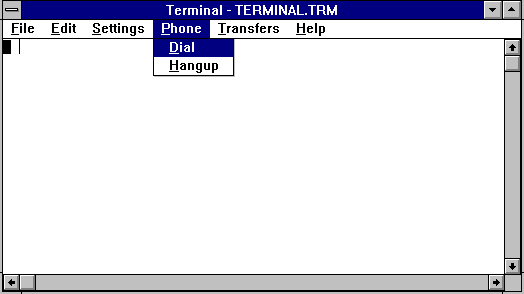
- This will dial your modem and connect you to the Internet.
Step 6: Creating a Folder and Shortcut to Interchange/Netinfo connections
(Creating shortcuts that work is only possible if the previous steps were completed for Interchange and Netinfo connections)
- In the Program Manager, go to the File menu at the top left of the screen.
- Select New...
- To create a new folder, make sure that the circle beside Program Group is filled with a black dot.? Click OK.
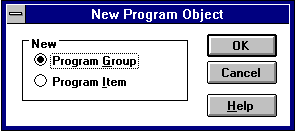

- A new menu will appear named Program Group Properties. Beside Description, enter Dial Up Connections.? Click OK when done.
- The folder Dial Up Connections has just been created. This is where the shortcuts will be placed.
The next step is to create the shortcuts in the Dial Up Connections folder.
- Double click on the Dial Up Connections folder so that it's open on your screen (if it's not already open.)
- In the Dial Up Connections window, go to the File menu at the top of the window.
- Select New...
- To create a new shortcut, this time make sure that the circle beside Program Item is filled with a black dot. Click OK.
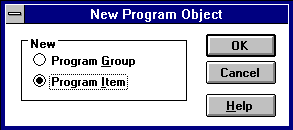
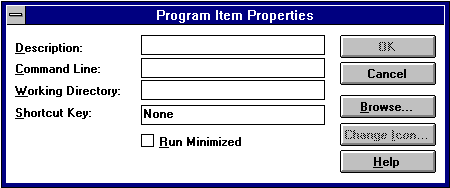
- In the new menu named Program Item Properties, enter the name of the new shortcut beside Description. To make the shortcut for Interchange, type Interchange under Description. To make the shortcut for Netinfo, type Netinfo under Description.
- Click on the Command Line box.
- If you are a creating a shortcut for Netinfo, type:
- C:\WINDOWS\TERMINAL.EXE netinfo.trm
- If you are creating a shortcut for Interchange, type:
- C:\WINDOWS\TERMINAL.EXE interchg.trm
- netinfo.trm and/or interchg.trm should have already been created if you followed the instruction at the top of this document.
- If you are a creating a shortcut for Netinfo, type:
- Click OK when done.
- A new Shortcut should appear in the Dial Up Connections window. You can repeat this process if you connect to both Interchange and Netinfo and want to create a second connection icon to the other one.
- Now accessing the connections to Interchange and Netinfo is a lot simpler.? Just open the Dial Up Connections folder and double click on the Interchange and Netinfo shortcuts.
Further Assistance
For additional technical support, please contact the IT Service Centre Help Desk .
When contacting the IT Service Centre Help Desk regarding problems with Dial-Up, please be ready to provide information such as:
- Your CWL username;
- Your operating system and version;
- The full text of any error messages that you receive.
