UBC offers a secure wireless network that can be accessed by compatible WiFi-enabled Symbian devices. For best results, it is recommended to only use these devices on the secure network ('ubcsecure') and not on the non-secure network ('ubc'). Also, while this procedure is for Symbian Series 60 devices, similar steps can be taken on other Symbian devices.
Note: UBC IT does not provide support for Symbian setup/installation. This document is provided as general reference only and is not confirmed to be working for all Symbian devices.
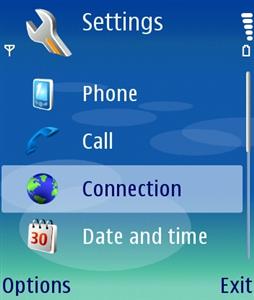
1) Push the Menu![]() button, then select Tools, and then Settings application.
button, then select Tools, and then Settings application.
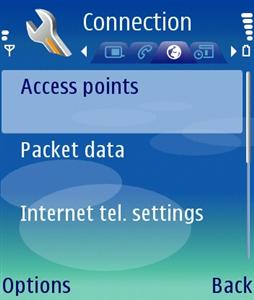
2) Select the Connection menu, then select Access Points.
3) Select Options, then choose New Access Point, and select Use default settings.
4) Enter the following settings for the connection:
- Connection name: ubcsecure
- Data bearer: Wireless LAN
- WLAN netw. name: Enter manually -> ubcsecure
- Network status: Public
- WLAN netw. mode: Infrastructure
- WLAN security mode: 802.1x


5) Click on the WLAN security sett. menu and ensure that WPA mode is set to EAP. Now open the EAP plug-in settings menu.

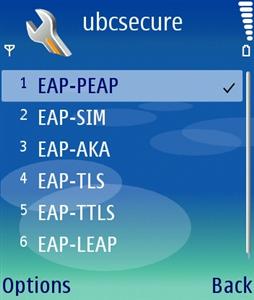
6) You will now be presented with a list of EAP protocols. Only EAP-PEAP should be enabled and moved to the top of the list. (Select EAP-PEAP in the list, push Options and then Enable. Then, use Raise Priority to move it to the top of the list). All other protocols should be disabled.
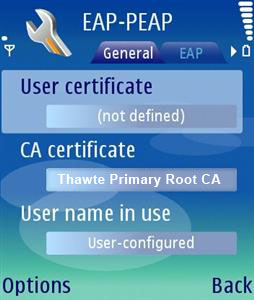
7) Now select EAP-PEAP, push Options, and then select Configure. Enter the following settings for EAP-PEAP:
- User certificate: (not defined)
- CA certificate: Thawte Primary Root CA
- User name in use:User-configured
- User name: [enter your CWL Username]
- Realm in use: User-configured
- Realm: [leave blank]
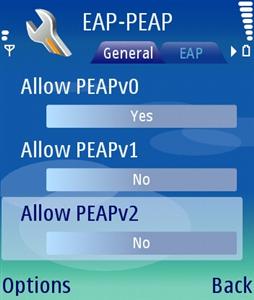
- Allow PEAPv0: Yes
- Allow PEAPv1: No
- Allow PEAPv2: No

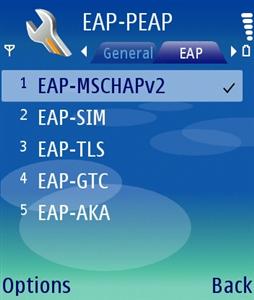
8) Now go Right to select the EAP tab. Only EAP-MSCHAPv2 should be enabled and moved to the top of the list. (Select EAP-MSCHAPv2 in the list, push Options and then Enable. Then, use Raise Priority to move it to the top of the list). All other protocols should be disabled.
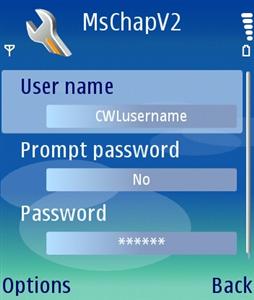
9) Now select EAP-MSCHAPv2, push Options, and then select Configure. Enter the following settings for EAP-MSCHAPv2:
- User name: [enter your CWL Username]
- Prompt password: No
- Password: [enter your CWL Password]
10) Now push Back until you are at the Standby screen. You are now able to connect to the secure UBC wireless network.
