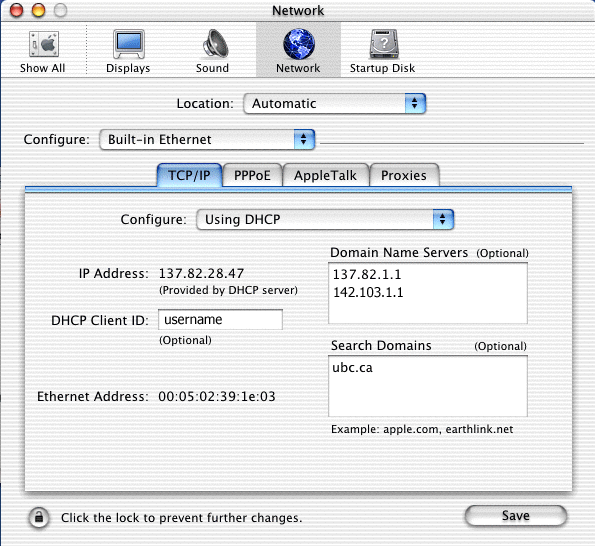
This document describes how to set up Mac OS X for DHCP (Dynamic Host Configuration Protocol), which lets you connect to the Internet using the following services:
- ResNet: Provides students in the Thunderbird, Place Vanier, Totem, Ritsumeikan-UBC, Gage, Green College, Fairview Crescent, St. John's, St. Andrew's and VST residences with a high-speed connection to the campus network and the Internet.
- DirectNet: A high-speed, network connectivity service that is only available on the UBC campus.
- Internet Access Ports: Allows those with Netinfo or Interchange accounts to plug in a laptop computer and access the campus network and the Internet. Internet Access Ports are currently available in the David Lam Library (main level), Koerner Library (mainly level 1), Law Library (all levels), Instructional Resource Centre (IRC), Agora Lounge (in the MacMillan Building), Buchanan (Block A), Frederic Lasserre Building, Liu Centre, Scarfe Building, Wesbrook Building.
- Wireless: One of the largest Campus Wi-Fi Networks in the world! We have more than 1550 access points (APs) deployed in over 150 buildings covering most of the 1000-acre campus.
Note: To use these high-speed Internet services, you require a laptop/desktop, a Network Interface Card (NIC) and an Ethernet cable. Network Interface Cards and cables are available at the UBC Bookstore and other computer stores.
Warning: If you are currently using a laptop to connect to a LAN (Local Area Network), the following Internet access port configuration settings may replace all, or part of, any existing network configuration you have on your laptop. Be sure to copy down your current network configuration settings and addresses before you re-configure your laptop for use with one of the above services.
This document assumes that your network interface card is installed and working correctly.
Step 1: Open System Preferences
- Click on the System Preferences Icon at the bottom of the screen.

- In the System Preferences window, click on Network.

Step 2: Configure TCP/IP
- Pull down the first Configure menu near the top of the screen, and select Built-in Ethernet.
- Make sure that the TCP/IP tab is selected, and that your screen matches the picture above.
- Pull down the Configure menu in the TCP/IP window and select Using DHCP.
- In the Domain Name Servers box, type in 137.82.1.1 on the first line and 142.103.1.1 on the second line.
- Under Search Domains, type in: ubc.ca
- Click on the Save button, then close the Network window.
- Restart your computer.
Step 3: Connecting to the Network/Internet
Once the required network components have been installed and your computer has been restarted, your computer will automatically request network information from the DHCP server, and you should be able to access the internet. If you are using DirectNet, you can now begin using the Internet or campus network by starting your browser, e-mail program or other Internet applications. If you are connecting using ResNet, Internet Access Ports or Wireless, you should also consult the appropriate section below.
Special Instructions for Internet Access Port Users
- After configuring your computer as instructed above, plug your Ethernet cable into your laptop computer and the Internet Access Port wall jack.
- Start your Web browser (e.g. Microsoft Internet Explorer, Netscape Communicator, etc) and go to any web page on the Internet outside of the ubc.ca domain.
- Login using your CWL (Campus-Wide Login) username and password.
- If your username and password are valid, you will then be redirected to the web page you were originally requesting.
Special Instructions for Wireless Users
- After configuring your computer as instructed above, ensure that your Wireless Network card is operational and reports full signal strength.
- You may need to go into control panels and select Airport to set up your Wireless options. Ensure that it is turned on and set the Network Name to: ubc
- Start your Web browser (e.g. Microsoft Internet Explorer, Netscape Communicator, etc) and go to any web page on the Internet outside of the ubc.ca domain. This will redirect you to the Wireless Login page.
- Login using your CWL (Campus-Wide Login) username and password.
- If your username and password are valid then you will then be redirected to the web page you were originally requesting.
- A pop-up window will appear that indicates that you are logged in. When you are finished with your Wireless session, be sure to click on the logout button in this window.
- If this window disappears or you happen to close it, you can simply type logout in the address bar of your web browser to get it back again.
Further Assistance
For additional technical support, please contact the IT Service Centre Help Desk.
When contacting the IT Service Centre Help Desk regarding problems with ResNet, please be ready to provide information such as:
- Your residence and room;
- Your CWL username;
- Your operating system and version;
If you are contacting the ITServices Help Desk by email, please make your problem description as detailed as possible.
