Before You Begin
Before beginning, please make sure you have a laptop with built-in wireless or that you have wireless network card. If you have a laptop with built-in wireless, make sure that it's turned on. There is normally a switch to turn on wireless, look for a little light with an antenna symbol, it should be on.
The following instructions are for use with these cards, but the basic instructions below should tell you how to configure most cards and their software accordingly.
Secondly, you require a CWL (Campus Wide Login) Account to access the Wireless service. If you are a student and you haven't registered for your free CWL account, you can do so by visiting the CWL webpage here: http://www.it.ubc.ca/cwl. If you are faculty or staff, your department may provide you with a free CWL account. Check with your administration to see if this program is in place. You can also call the ITServices Sales Desk for more information at 604-822-2441.
Basic Instructions
When you purchase a wireless network card, or a notebook with a built-in wireless network card, it will come with its own software for connecting to a wireless service. Because wireless is a new technology not built into most operating systems, you will need to rely upon the wireless card's software to get connected. Each brand of wireless network card will have its own way of setting itself up. Regardless of differences, all the software packages should ask for the same information. Below is a list of information that is useful for setting up a wireless profile with your wireless card's software:
- The Network Type should be set to: Access Point.
- Set the Wireless Network Name or SSID to: ubc.
- Using any or leaving it blank should also work.
- Security should not be enabled.
- Power management should be turned off.
- If there is an option to renew your IP address automatically, then agree to that.
In the following section, you'll find instructions on how to set up a wireless profile using Orinoco wireless network cards. Even if this isn't your network card, the instructions may help you to determine where information should be placed.
Instructions for Orinoco Wireless Network Cards
Once you have installed your wireless network card's software and booted your machine, look for the Orinoco Client Manager icon (circled in red below) in your system tray, located on your toolbar beside the clock:
![]()
Please note: The Orinoco Client Manager icon may be green if wireless activity is detected. If it is green, go to the 'Connecting to the Internet' section (below). If that doesn't work, return to these instructions.
If the Orinoco Client Manager icon is red, do the following:
- Double-click on this icon in the system tray.
- If you do not see this icon, you can also find the program under:
Start -> Programs -> ORiNOCO -> Client Manager. - Once you have opened the Orinoco Client Manager, you should see a
screen like this:
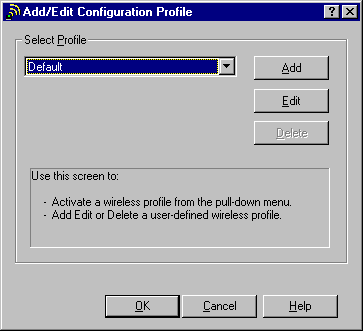
- Click on the Actions pull down menu and select Add/Edit
Configuration Profile to access the Add/Edit Configuration
Profile dialog box:
- Click on the Add button to add a new wireless profile with the
Edit Configuration dialog box:
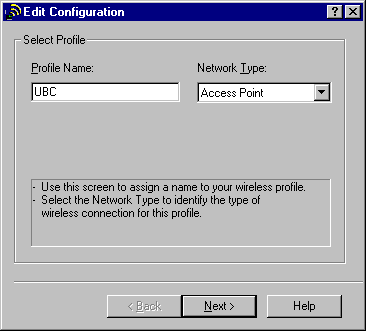
- In the Profile Name box, type: UBC .
- In the Network Type pull down list, select: Access Point.
- Click Next.
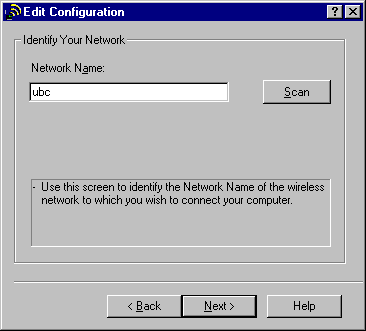
- Under Network Name, type: ubc.
- You may also use any or leave it blank and it will still work.
- Click Next.
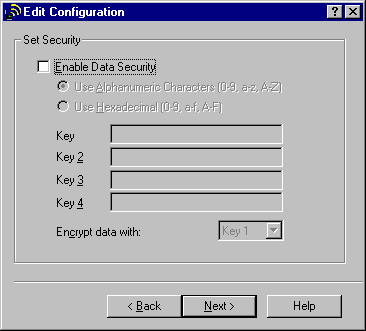
- Make sure that Enable Data Security is NOT checked.
- Click Next.
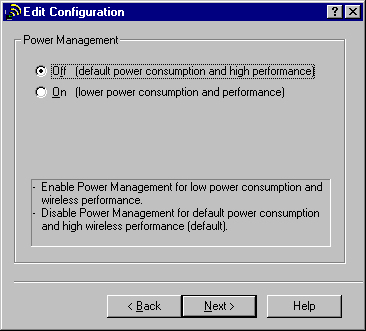
- Set Power Management to: Off (default power consumption and high performance).
- Click Next.

- Make sure that Renew IP Address when selecting this profile is checked.
- Click Finish.
- You should now be brought back to the Add/Edit Configuration Profile page.
- Click OK.
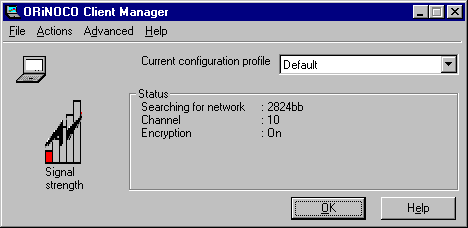
- This should take you back to the ORiNOCO Client Manager. If you set
everything up correctly and you are in a Wireless area, you should see Green bars on the
left of the window and information in the Status window. It should look something like
this:
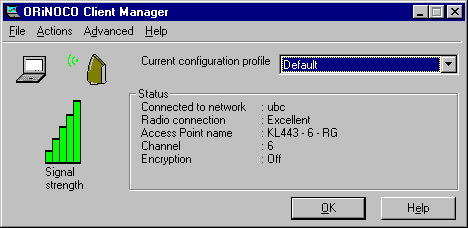
If this is the case, then you are ready to use the UBC Wireless service. Click
OK.
In the system tray, you should now see the icon coloured green indicating that you are
connected via wireless:
![]()
Connecting to the Internet
- To connect to the Internet, simply open a web browser and go to any web page. This will redirect you to the UBC Network Wireless Login page.
- Enter your CWL username and password and click Go.
- Note: Your username is not the same as your e-mail address; if your e-mail address is username@interchange.ubc.ca, then your username is username. Usernames and passwords are case-sensitive, so make sure that your CAPS LOCK key is turned off.
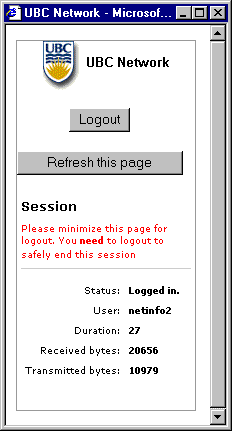
- After you have logged in with your CWL username and password, a window will appear indicating the amount of time you have been online and the number of bytes transferred.
- There are a few web sites that you can visit if you do not log in. These include:
- The Campus Wide Login web site (to register for a CWL account): http://www.cwl.ubc.ca.
- The myUBC web site: http://my.ubc.ca.
- The Library web site: http://www.library.ubc.ca.
- When you are finished with your Wireless session and want to log out, make sure that
you click on the Logout button in this window.
Once you have successfully logged out, you can shut down your computer or resume your normal computer work. You are now ready to configure your computer for VPN access.
If you have any questions on this, please contact us.
