This document explains how to configure iPhone or iPod touch (running Software Update 2.0 or later) with your UBC FASmail account to access your calendar, contacts, and mail.
- UBC IT does not provide support for iPhone and iPod touch setup/installation. This document is provided as a general reference only.
- FASmail will enforce the Mobile Access to Services and Data Standard for information security. Specifically, FASmail requires t hat mobile devices must be:
- Protected with a password of at least five characters, unless limited by the device OS
- Configured to lock the screen automatically, after no more than 30 minutes of inactivity, with password protection
- Encrypted via device level encryption
- Configured such that they can be remotely wiped in the event of loss or theft
Important Please do not proceed with these setup instructions unless you are able to commit the new required 5-character/digit passcode to memory.
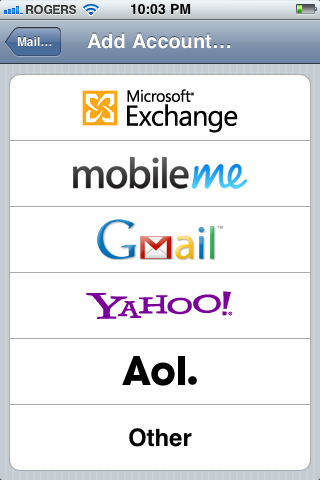
1) From the Home screen, tap Settings > Mail, Contacts,
Calendars > Add Accounts... > Microsoft Exchange.
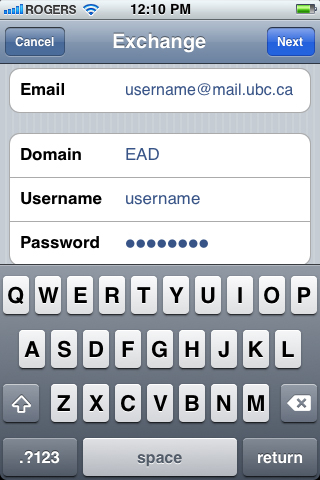
- In the Email field, enter your email address.
- In the Domain field, enter: EAD
- In the Username field, type in username , where username is your assigned FASmail (CWL) username.
- In the Password field, enter your assigned CWL password.
- In the Description field, type in UBC FASmail.
- When all fields are filled in, tap Next.
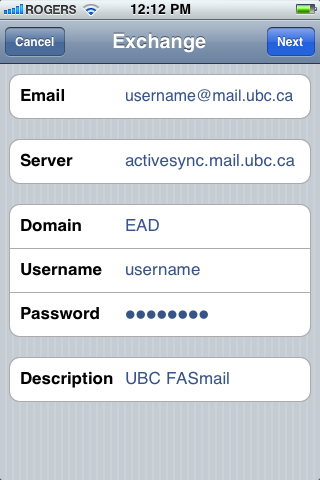
3) After a few moments, a field labeled Server will appear below the Email field.
- If the Server field isn't automatically filled in, enter activesync.mail.ubc.ca and tap Next.
-
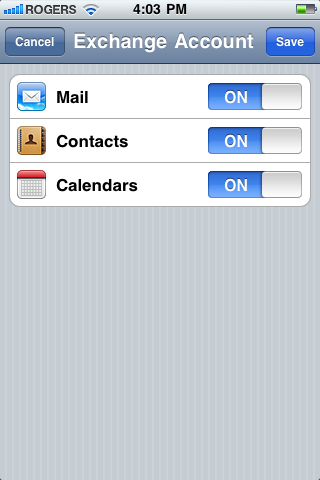
Synchronization Options
- Mail: Select Mail to synchronize your FASmail mailboxes to your mobile device.
-
- Allows sending and receiving of email using the built-in Mail application.
- Contacts: Select Contacts to synchronize your FASmail contact list to your mobile device.
-
- Important: Synchronizing Contacts with FASmail will remove all contacts currently on your mobile device.
- Allows you to access your personal FASmail contact list. New contacts created on your mobile device are immediately synchronized and made available in Outlook/Entourage.
- Allows you to access and search the UBC Global Address List (GAL) using the built-in Contacts application.
- Calendars: Select Calendars to synchronize your FASmail calendar to your mobile device.
-
- Important: Synchronizing Calendars with FASmail will remove all calendars currently on your mobile device.
- Allows you to access your personal FASmail calendar using the built-in Calendar application.
- Allows you to accept/decline meeting requests. Currently, you cannot create meeting requests on iPhone / iPod touch.
- Allows you to create personal events (not meeting requests) on your FASmail calendar.
Currently, you cannot synchronize tasks or notes from FASmail to iPhone / iPod touch.
When you have finished selecting your synchronization options, tap Save.
5) Tap the Home button to return to the main screen and wait approximately one minute.
6) Go into the Mail icon and ensure that you are accessing the UBC FASmail mailbox. You will either see "UBC FASmail" or "Mailboxes" at the top left of the screen. If not, tap the back arrow at the top left and select "All Inboxes".
7) If you haven't waited long enough, you will see an error message stating "Cannot Get Mail - The connection to the server failed." Click the Home button to return to the main screen and wait approximately one minute and try again.
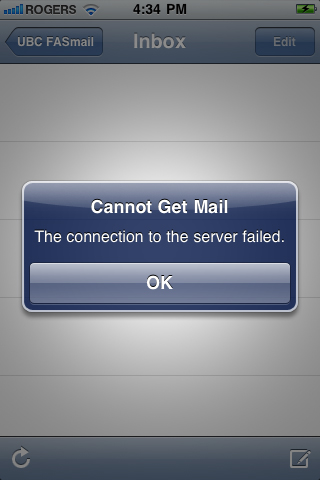
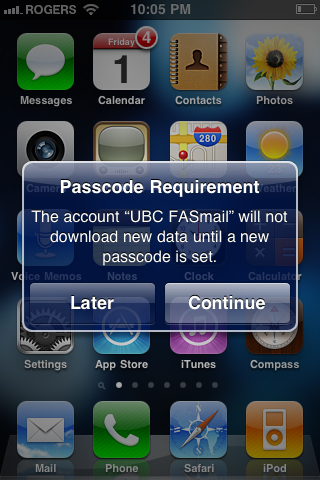
8) Repeat step 7 until the passcode requirement screen appears. When it does finally connect, you will see a prompt explaining that "UBC FASmail" requires a passcode. Please do not proceed with these setup instructions unless you are able to commit the new required 5-character/digit passcode to memory. If this is not a problem, tap Continue. Otherwise, click Later and continue with the setup at a later date.
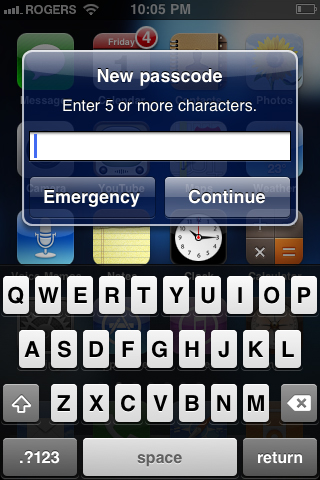
9) Enter a new passcode (5 or more characters) and tap Continue.
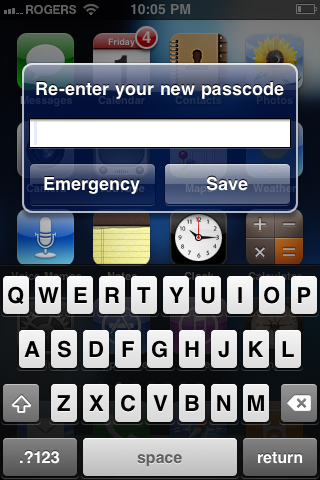
10) Re-enter the same passcode on the confirmation screen and tap Save.
11) Your iPhone / iPod touch is now configured for UBC FASmail. Go to the Home screen and tap the Mail icon to access your FASmail account.
Advanced Options
Setting your Default Mail, Contacts and Calendar
If you have access multiple mailboxes on your iPhone, you will need to tell your phone which account is your primary or default account.
To set your default account for Mail, Contacts and Calendars:
- From the Home screen, tap Settings > Mail, Contacts, Calendars .
- Scroll down to the end of the Mail section, tap Default Account and select the mailbox that you wish to make as your primary mail account.
- Tap the Back button to return to the previous page.
- Scroll down to the Contacts section, tap Default Account and select the account that contains your primary contact list.
- Tap the Back button to return to the previous page.
- Scroll down to the Calendar section, tap Default Account and select your default calendar.
- Tap the Home button to return to the main screen.
Configuring your mail and calendar synchronization settings
If your device is configured to synchronize Mail, it will retrieve messages that are three
days old or newer. If your device is configured to synchronize Calendars, it will retrieve
events that are one month old or newer.
To synchronize a different range of mail messages:
- From the Home screen, tap Settings > Mail, Contacts, Calendars . Then, under Accounts, select your UBC FASmail account.
- Tap Mail days to sync.
- Select how far back you would like to synchronize your email messages. To retrieve all messages in your FASmail mailbox, select No Limit .
To synchronize a different range of calendar events:
- From the Home screen, tap Settings > Mail, Contacts, Calendars . Then, scroll down to the Calendar section and tap Sync.
- Select how far back you would like to synchronize calendar events. To retrieve all events on your FASmail calendar, select All Events.
