This document explains how to configure iPhone or iPod Touch (running Software Update 2.0 or later) with your Student and Alumni Email account to access your calendar, contacts, and mail.
Important Notes:
- UBC IT does not provide support for iPhone and iPod Touch setup/installation. This document is provided as a general reference only.
- The Student and Alumni Email UBC hosted mailbox service will not enforce the mobile device policy referenced in the UBC Information Security Policy, Standards and Resources (Standard # 7). It is recommended that you protect your iPhone or iPod Touch with a passcode.
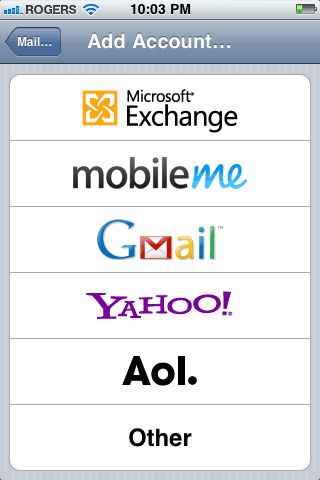
- From the Home screen, tap Settings > Accounts & Passwords > Add Accounts... > Microsoft Exchange.
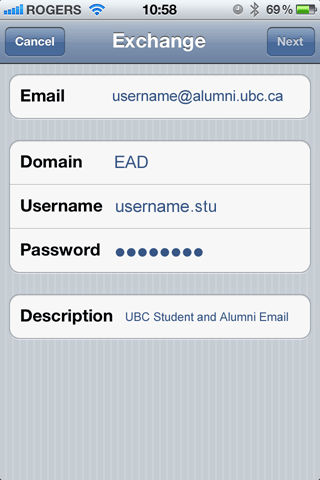
- On the Exchange account information screen:
- In the Email field, enter your full email address.
- In the Domain field, enter: EAD
- In the Username field, type in username.stu, where username is your UBC Student and Alumni Email username.
- In the Password field, enter your password.
- In the Description field, type in UBC Student and Alumni Email.
- When all fields are filled in, tap Next.
- After a few moments, a field labeled Server will appear below the
Email field.
- If the Server field isn't automatically filled in, enter
activesync.alumni.ubc.ca and tap Next.
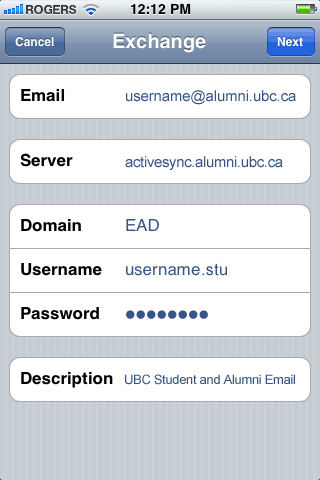
- If the Server field isn't automatically filled in, enter
activesync.alumni.ubc.ca and tap Next.
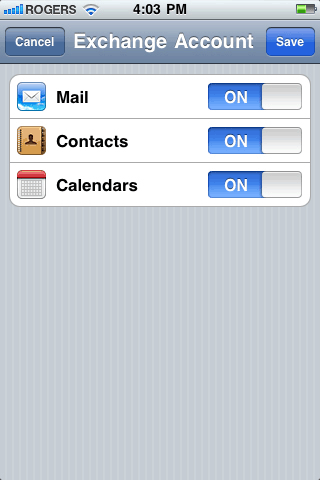
- You will now be asked what information you would like to synchronize between your
device and UBC Student and Alumni Email. WARNING: All on-device contacts and
calendars will be replaced by your UBC Student and Alumni Email data should you choose to
sync these categories. Please refer to the synchronization information below for
further information.
Synchronization Options
- Mail: Select Mail to synchronize your UBC Student and Alumni Email mailbox to your mobile device.
-
- Allows sending and receiving of email using the built-in Mail application.
- Contacts: Select Contacts to synchronize your UBC Student and Alumni Email contact list to your mobile device.
-
- Important: Synchronizing Contacts with UBC Student and Alumni Email will remove all contacts currently on your mobile device.
- Allows you to access your personal UBC Student and Alumni Email contact list. New contacts created on your mobile device are immediately synchronized and made available in the UBC Student and Alumni Email webmail.
- Allows you to access and search the UBC Global Address List (GAL) using the built-in Contacts application.
- Calendars: Select Calendars to synchronize your UBC Student and Alumni Email calendar to your mobile device.
-
- Important: Synchronizing Calendars with UBC Student and Alumni Email will remove all calendars currently on your mobile device.
- Allows you to access your personal UBC Student and Alumni Email calendar using the built-in Calendar application.
- Allows you to accept/decline meeting requests. Currently, you cannot create meeting requests on iPhone / iPod Touch.
- Allows you to create personal events (not meeting requests) on your UBC Student and Alumni Email calendar.
Currently, you cannot synchronize tasks or notes from UBC Student and Alumni Email to iPhone / iPod Touch.
When you have finished selecting your synchronization options, tap Save.
- Tap the Home button to return to the main screen and wait approximately one minute.
- Go into the Mail icon and ensure that you are accessing the UBC Student and Alumni Email mailbox. You will either see "UBC Student and Alumni Email" or "Mailboxes" at the top left of the screen. If not, tap the back arrow at the top left and select "All Inboxes".
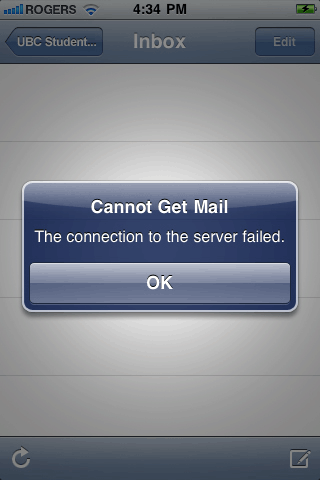
- If you haven't waited long enough, you will see an error message stating
"Cannot Get Mail - The connection to the server failed." Click the
Home button to return to the main screen and wait approximately one minute
and try again.
- Your iPhone / iPod touch is now configured for UBC FASmail. Go to the Home screen and tap the Mail icon to access your FASmail account.
Advanced Options
Setting your Default Mail, Contacts and Calendar
If you have access multiple mailboxes on your iPhone, you will need to tell your phone which account is your primary or default account.
To set your default account for Mail, Contacts and Calendars:
- From the Home screen, tap Settings > Mail, Contacts, Calendars .
- Scroll down to the end of the Mail section, tap Default Account and select the mailbox that you wish to make as your primary mail account.
- Tap the Back button to return to the previous page.
- Scroll down to the Contacts section, tap Default Account and select the account that contains your primary contact list.
- Tap the Back button to return to the previous page.
- Scroll down to the Calendar section, tap Default Account and select your default calendar.
- Tap the Home button to return to the main screen.
Configuring your mail and calendar synchronization settings
If your device is configured to synchronize Mail, it will retrieve messages that are three
days old or newer. If your device is configured to synchronize Calendars, it will retrieve
events that are one month old or newer.
To synchronize a different range of mail messages:
- From the Home screen, tap Settings > Mail, Contacts, Calendars . Then, under Accounts, select your UBC Student and Alumni Email account.
- Tap Mail days to sync.
- Select how far back you would like to synchronize your email messages. To retrieve all messages in your UBC Student and Alumni Email mailbox, select No Limit .
To synchronize a different range of calendar events:
- From the Home screen, tap Settings > Mail, Contacts, Calendars . Then, scroll down to the Calendar section and tap Sync.
- Select how far back you would like to synchronize calendar events. To retrieve all events on your UBC Student and Alumni Email calendar, select All Events.
