General | Accessing MS Teams | How Tos | Privacy & Security | Integrations | Known Issues
General
No, staff accounts and student accounts are separate entities and cannot be merged. Staff Team accounts rely on you being an active employee and have an active employment with UBC, whereas student teams rely on having an active student status with at least 1 registered course with UBC. You may review the "What are the service requirements to access MS Teams?" question for staff/faculty and students under Accessing MS Teams section for more details.
Please refer to the Microsoft website: https://docs.microsoft.com/en-us/microsoftteams/limits-specifications-teams
By default, users will be provisioned on Collaboration mode with Skype for Business, so you won't be able to utilize the full functions of Teams.
Teams Only mode:
- You can still chat with other Skype for Business users in the Teams app
- You cannot initiate Skype for Business calls or meetings
- You can still join other people's Skype for Business meetings
- You will need to rebook any Skype for Business meetings that you are hosting (in Teams)
Skype for Business with Teams Collaboration mode:
- Your Skype calls, 1:1 chat(s) and meetings will remain in Skype for Business
- You will only have access in Teams to team channels collaboration
- You cannot create any Teams meetings
If you wish to get on Teams only mode, kindly submit your request here: https://forms.share.ubc.ca/request-teamsonlymode/SitePages/Home.aspx
Microsoft Teams (or MS Teams or Teams) is a collaboration platform for groups of users to share information and create content together. MS Teams will address the collaboration gaps for:
Students
- Interaction with peers and instructors
- Hosting virtual meeting spaces
- Facilitating group work
- Real-time document collaboration using Word, PowerPoint, OneNote and Excel
Faculty
- Hosting office hours
- Hosting instructional sessions for students
- Interaction with colleagues work and teaching assistants
- Real-time document collaboration using Word, PowerPoint, OneNote and Excel
Staff
- Asynchronous collaboration with colleagues
- Real-time document collaboration using Word, PowerPoint, OneNote and Excel
MS Teams will not be replacing any current collaboration tools, such as Zoom.
Faculty and staff using Skype for Business can upgrade to MS Teams to leverage features available in Skype for Business and MS Teams in one platform.
Skype for Business, MS Teams and Zoom offer various features. Please refer to this features comparison chart to select the tool that fits your need.
In addition to offering MS Teams and OneDrive in our phase 1 MS365 rollout, Microsoft Word, Excel, PowerPoint, OneNote apps will also be included to support document collaboration within MS Teams and OneDrive. If you would like to request other applications to be prioritized for subsequent phases, please provide your feedback here
Note: Each future Microsoft 365 app that is added will need to go through a Privacy Impact Assessment.
Accessing MS Teams
MS Teams is available for all active students, faculty, and staff.
Students:
All students who meet following criteria can request access to MS Teams:
- Student has registered in courses with status codes: 'REGI', 'CONT', 'WTHD' and 'OLVE'
- Student has paid fees
A grace period of 2 years is currently in place to handle exceptions after graduation.
Faculty/Staff:
All active employees who meet the service requirements (please reference this page) are automatically provided access to MS Teams.
Contract employees with a UBC email address are not eligible for a MS Teams license at this time. However, they can be invited as guest by a UBC user using their non-UBC email address.
Guests:
Non-UBC guests can be invited by UBC users to collaborate using MS Teams. However, non-UBC guests are not eligible for a UBC MS Teams license.
Guests with a sponsored Campus-Wide Login account are also not eligible for MS Teams license at this time. However, they can be invited as guest by a UBC user using their non-UBC email address.
32-bit or 64-bit version of Windows 10 and Mac OS 10.12 or later. View the system requirements.
Students:
Active UBC student with all the criteria below are eligible for the full functionalities of MS Teams:
- An active Enterprise Active Directory (EAD) account
- An active UBC Student Email mailbox with a cwl@student.ubc.ca email address
To request a Student Email mailbox and access to MS Teams, sign up using CWL MyAccount page. Please note that it may take up to 48 hours to gain access to the mailbox and to gain access to MS Teams.
Note: If you wish to anonymize your CWL account, you may do so by selecting the Rename CWL on the CWL MyAccount page once a year. By accepting the Terms of Service, you affirm consent to use your cwl name to create your UBC Student Email mailbox. Your UBC Student email will be used as your login ID for the MS Teams and OneDrive services. If you would like to rename your CWL more than once a year, please contact the UBC IT Service Centre.
Faculty and Staff:
Active UBC faculty or staff who meet all the criteria below are eligible for the full functionalities of MS Teams:
- An active Enterprise Active Directory (EAD) account
- An active Faculty and Staff (FASmail) mailbox
- A firstname.lastname@ubc.ca email alias that is associated with your FASmail mailbox
The firstname.lastname@ubc.ca email alias does not have to be set as your primary email address.
The service will automatically be provisioned for you once you have met all the above criteria. It may take up to 48 hours to synchronize your account information before it can be used to access MS Teams and OneDrive.
If you have a FASmail account but do not have a firstname.lastname@ubc.ca email alias, please contact your department directory admin.
If you do not have FASmail account, please contact your local IT Helpdesk or UBC IT Service Centre
Teaching Assistants and Research Assistants:
Teaching Assistants and Research Assistants with active UBC employee statuses are eligible to utilize MS Teams if they meet the above-mentioned list of criteria for active staff, faculty and students.
Teaching Assistants and Research Assistants who are also active students are eligible for both Faculty/Staff and Student accounts.
Guests and Non-active UBC Employee
If you are not an active UBC employee or student, you may have access through an external MS Teams guest account, created when a UBC employee sends you a meeting invite.
Please refer to the Service Requirements section to get access to MS Teams. Once you have access, follow steps below to login:
- Go to https://portal.office.com . (For Faculty and Staff using UBC owned devices may find MS Teams via Software Centre)
- For staff and faculty, login with your firstname.lastname@ubc.ca. For students, login with your cwl@student.ubc.ca.

- Enter your CWL password.

- Stay signed in? Click Yes, if you choose to stay signed in. This is recommended if you are on your work computer and you don't want to be asked to sign in every time. Otherwise, click No to receive the prompts for login credentials each time you access MS Teams. Faculty/Staff may be prompted for additional multi-factor authentication verification via Cisco DUO.

- Click the MS Teams icon. A window will pop-up for you to choose Get the Windows app or "Use the web app instead." If you choose to download MS Teams on your desktop, click Get the Window app and continue to Step 6. If you would like to use MS Teams on your internet browser, click Use the web app and continue to Step 10.
Get the Windows app on your Desktop/laptop?

- After you download the installation .exe file, click on the file to install MS Teams.

After you have installed MS Teams, the following window will pop-up. Click Continue.

- For staff and faculty, enter in your firstname.lastname@ubc.ca and click Next.
For students, enter your cwl@student.ubc.ca address and click Next.

- You will be prompted to stay signed in to all your apps with your UBC account on your device. If you would like to, check Allow my organization to manage my device and click OK. This setting is to trust the device (laptop/mobile) registered in the server. If you log in from the same device in the future, it will not prompt you for your credentials.
- If you are using a temporary device, you may uncheck the option for allow my organization to manage my device. Click No, sign in to this app only at the bottom afterwards.

- You should have successfully installed MS Teams! You may not be able to see any MS Teams sites like in the picture below until you "Join or create team". The Team owner will provide you a code to join. Feel free to refer to the FAQs page on how to join a team and other how-to instructions.

Use the Web App Version instead
- Since you have previously already signed into the https://portal.office.com with your firstname.lastname@ubc.ca or cwl@student.ubc.ca account and CWL password, your browser should take you directly to your MS Teams web app version show below:

- If you changed your mind and would like to get the MS Teams desktop version instead, you may do so by clicking on the following icon on the bottom left corner of the web app version.

- Your browser should automatically download the installation .exe file:

Continue from Step 6 above for the rest of the instructions on Get the Windows app on your desktop.
- You may find the MS Teams web app at https://teams.microsoft.com..
- Supported browsers are: Internet Explorer 11, Microsoft Edge, latest version of Chrome and latest version of Firefox.
- You may find the MS Teams web app at https://teams.microsoft.com.
- Supported browsers are: Internet Explorer 11, Microsoft Edge, latest version of Chrome and latest version of Firefox.
- For iPhone iOS 10.0 and later users, go to App store and search for Microsoft Teams and download the app, or click here for direct link: https://apps.apple.com/app/id1113153706
- For Android 4.4 version and later users, go to Play store and search for Microsoft Teams and download the app, or click here for direct link: https://play.google.com/store/apps/details?id=com.microsoft.teams
- Login with your firstname.lastname@ubc.ca (Faculty/staff) or cwl@student.ubc,ca (Student)
- Enter your CWL password
- You should now be logged into Microsoft Teams and ready to connect with your colleagues.
The MS Teams client is available for Linux and can be downloaded at the general link: https://www.microsoft.com/en-ca/microsoft-365/microsoft-teams/download-app
Shared devices will not be deployed with MS Teams and OneDrive; however, user will be able to use the web version to access the applications.
Both MS Teams and OneDrive apps will have regular updates will be provided by Microsoft. The schedule of updates will be determined by Microsoft.
Skype for Business with MS Teams Collaboration mode:
- Your Skype calls, 1:1 chats and meetings will remain in Skype for Business
- You will only have access in MS Teams to team channels collaboration
- You cannot create any MS Teams meetings
Teams Only mode:
- You can still chat with other Skype for Business users in the MS Teams app
- You cannot initiate Skype for Business calls or meetings
- You can still join other people's Skype for Business meetings
- You will need to rebook any Skype for Business meetings that you are hosting (in MS Teams)
If you wish to get on MS Teams only mode, please complete your request via our online form.
How Tos
Live Captions/Translation features are not available at the moment. Some of this data may leave Canada so further investigation is required in the Privacy Impact Assessment (PIA) process. More information on PIA, please refer to: https://privacymatters.ubc.ca/privacy-impact-assessment
Since we host FASmail Exchange on premise, you cannot change your profile picture in Teams directly in the application. It will result in an error. You have to upload your picture in the FASmail webmail interface (https://www.mail.ubc.ca).
To apply delegate access, you need to go to Outlook > Files > Account Settings > Delegate Access and Add users you wish to provide delegate access to for others to book meetings on your behalf.
If you have access to your manager's calendar, you can also book a Teams meeting directly in their Outlook Calendar, this is not available on the Teams Calendar yet from Microsoft. However you both need to be in "Teams Only" mode. To request, visit this site: https://forms.share.ubc.ca/request-teamsonlymode Note that at this time, audio conferencing (dial-in) is not available. Only connecting to meetings via the Internet is possible at this time.
Due to the PIA requirements, students are not allowed to display their names in the Student Email, Teams, and OneDrive.
The display name is set by default to your email address: cwl@student.ubc.ca
For more information to Privacy Impact Assessment (PIA), please visit: https://privacymatters.ubc.ca/privacy-impact-assessment
- Start a new chat by clicking on the Chats icon on the left panel.
- Then click on the New chat icon: at the top of the chat list.
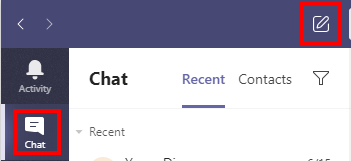
- Enter the person's (you may add multiple people for a group conversation) name you want to chat with, compose your message in the box at the bottom of the chat. To open your formatting options, select Format beneath the box where you type your message.
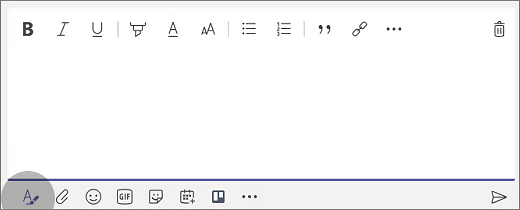
- When you're ready, select Send
 . This starts the chat.
A Team is a collection of people, content, and tools surrounding different projects and outcomes within an organization. A team is designed to bring together a group of people who work closely to get things done.
Channels are places where conversations happen and where the work actually gets done.
In order to start a Team at UBC you will need to submit a Team Request.
Click here for the Departmental Team Request Form for Staff and Faculty
You may also call 604.822.2008 IT Service Center for assistance to submit the request.
To join an existing Team, you should have received a code from the team owner:
- Click Teams on the left side of the app.

- Click on "Join or create team" on the top right.

- The window will populate asking you to enter the code you received from the group owner., enter it in the text box. Then you should have joined the team successfully.

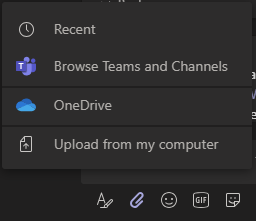
Method 1: Attach it to a message
Sharing a file/document in a chat or your team/channel by clicking on the paperclip/attachment icon. Select the location of where the file/document you wish to share.
Method 2: Click on  tab, which is located at the top of every chat/channel
You will find all the files that has been shared in this location.
In a Chat, you can click on Files > Share and select the location of the file/document you wish to share.
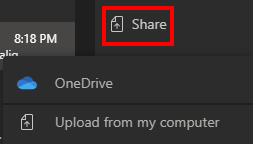
You may need to click on the refresh icon  at the top right corner for the file to load up, after that you should see:

In a Team or Channel, you can click on Files > Upload and locate the file/document(s) you want to share. You may upload multiple at a time. Alternatively, you can just drag and drop the file/document.
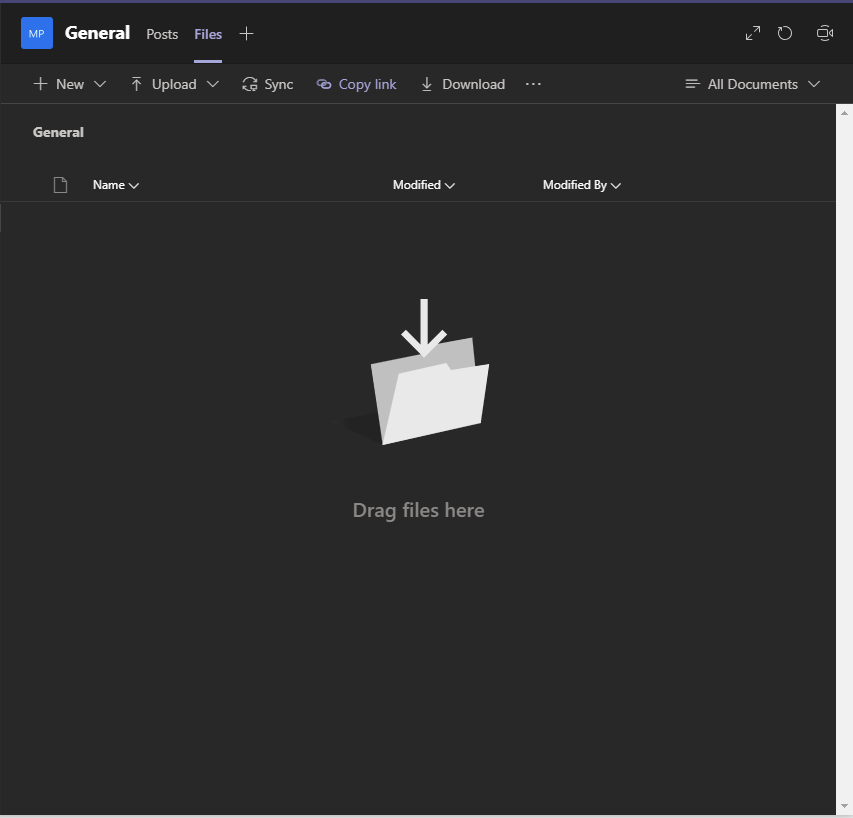
For more information, follow these step-by-step instructions on the Microsoft Teams support page.
You will need to be the team owner of your team to create a Standard Channel:
To create a standard channel (which are public to the whole team, refer to private channels below to have it strictly between the members added), locate the team list you want the channel to be under. Beside the team name, you will find More options > Add channel. You can also click Manage team, and add a channel in the Channels tab.

To add members to the standard channel:
- Go to the team you want to create the private channel for and choose More options > Add Member.
Creating a Private Channel:
- Go to the team you want to create the private channel for and choose More options > Add channel.
- Enter a name and description for your channel.
- Under Privacy, select the down arrow on the right, and then select Private – Accessible only to a specific group of people within the team.
- Select Add. This adds a private channel to the team.
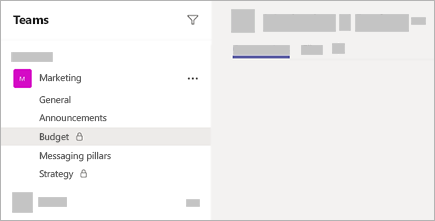
To add members the private channel:
As a private channel owner, you can add or remove members, and edit private channel settings. Each person that you add must first be a member of the team.
To add members of your team to a private channel:
- Next to the private channel name, select More options More options > Add members.

- Use the Members and Settings tabs to add or remove members and assign roles. Your private channel can have multiple owners and up to 250 members.
- When you're ready, select Done. Members can send messages in the private channel.
- To schedule a meeting from Outlook, you may switch to the calendar view. Click New Teams Meeting at the top.
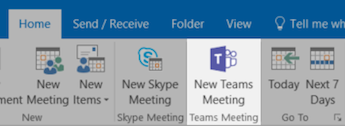
- You should be able to see the invite link that populates to the meeting invite.
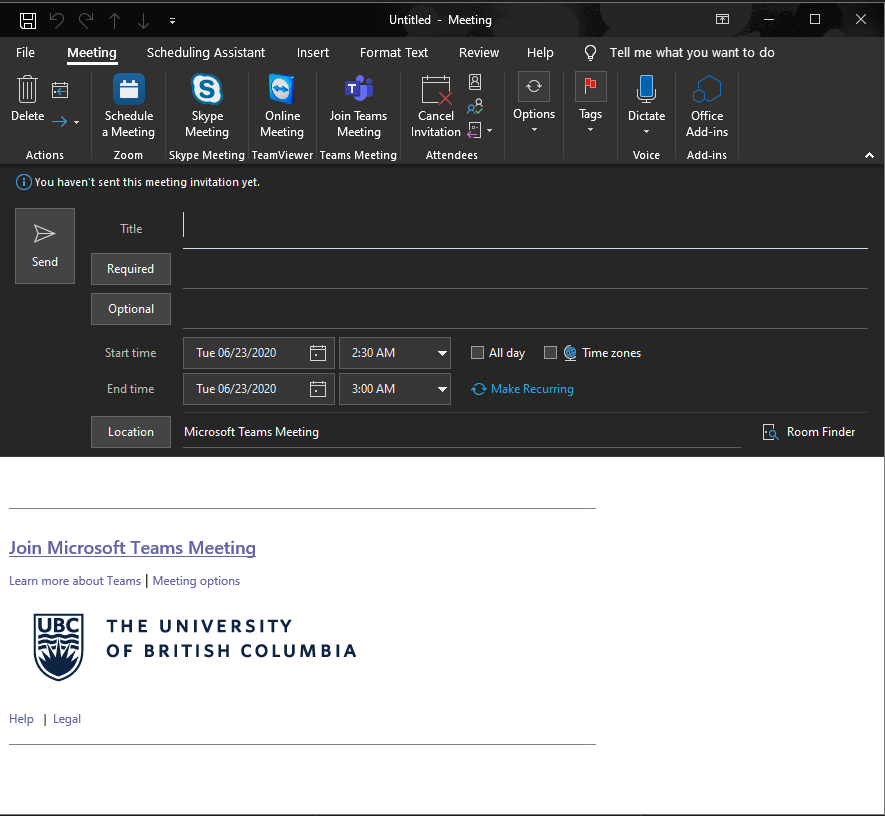
- Add your invitees in the To or Required field as if you are scheduling regular meetings.
- The invitees will receive this meeting invite and at the scheduled meeting time will be able to click on the "Join Microsoft Teams Meeting" link to enter the virtual meeting.
- Window from your web browser will populate for you to select the following options:
As an active UBC staff/faculty/student with a registered Teams account click on "Open Microsoft Teams" to enter the online meeting.
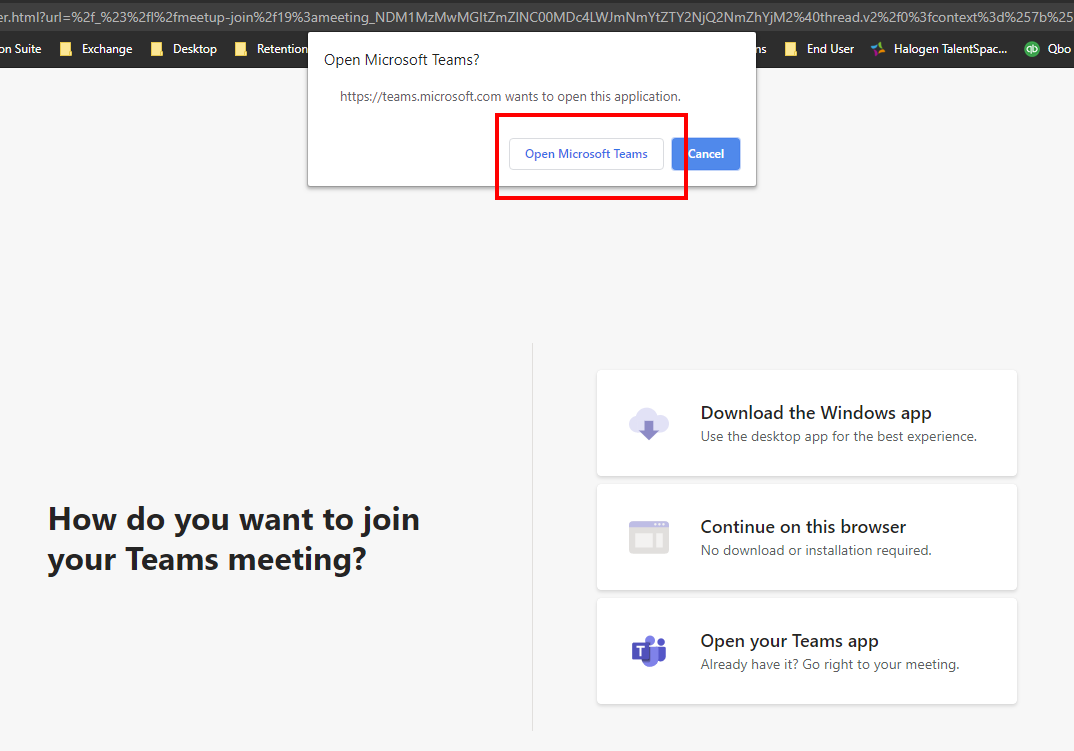
Teams application will open, and you will be entered into the meeting.
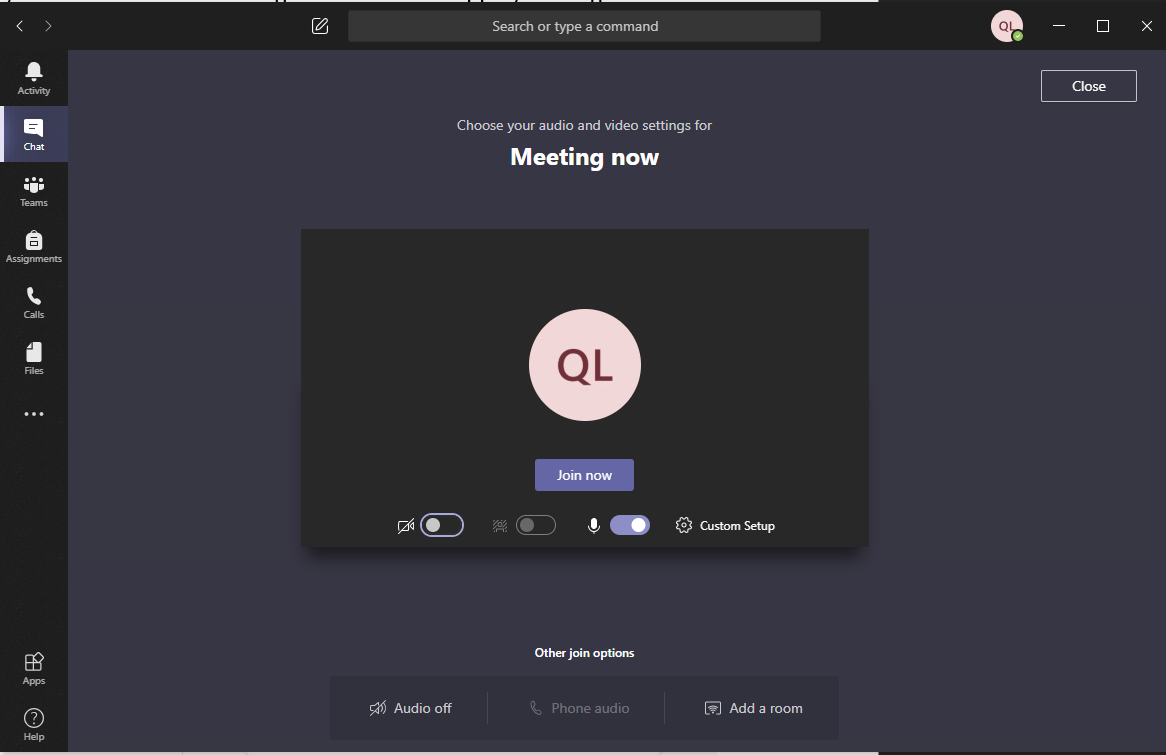
After you enter the meeting, you will need to Admit external users/guest users to join the meeting as they enter the meeting or when you are ready to greet them.

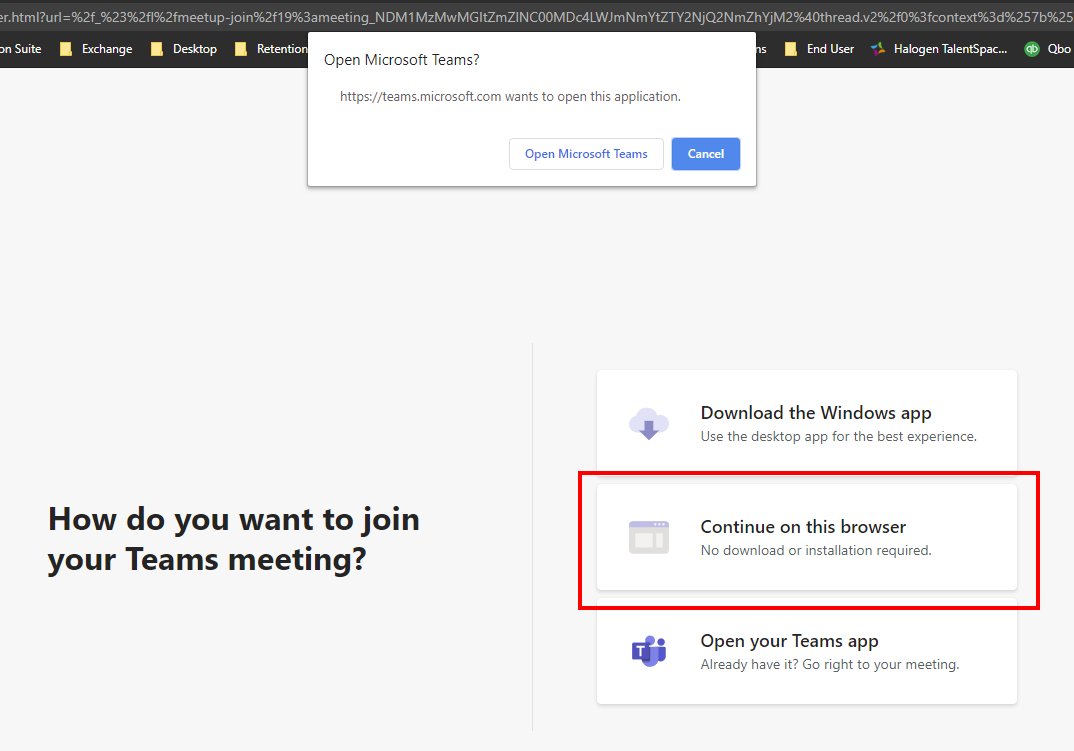
As a guest user (external users) and will enter the meeting via Teams Web App by clicking on "Continue on this browser".
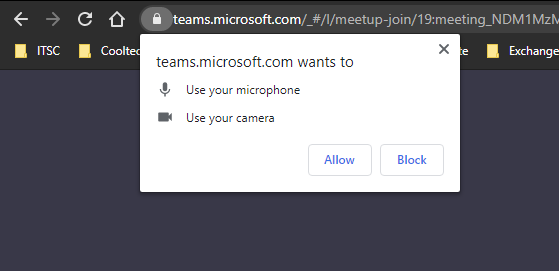
First time guest users will see the following window that will populate from your browser asking for permission to use your microphone and camera for audio and video conferencing purposes. Kindly click on "Allow" to proceed with the meeting.
Then you should see the following window for you enter your name in the Enter name text box and click on "Join now" when you are ready to enter the virtual meeting.

When external users are joining the meeting a bit early or if the meeting hasn't started yet, they will be seeing the following window until an active UBC staff/faculty/student with a registered Teams account joins the meeting.
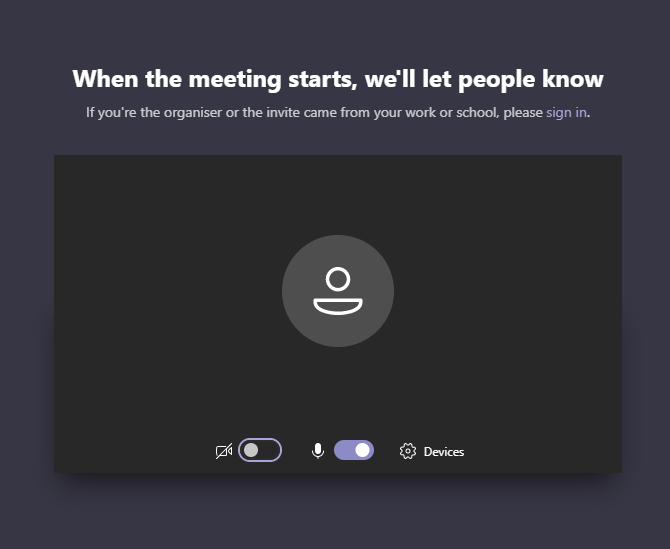
The meeting will automatically begin when the organizer or an active UBC user admits you into the meeting.
You must be on Teams only mode to be able to schedule a Teams meeting. To submit a request or find out what is Teams only mode, refer to https://forms.share.ubc.ca/request-teamsonlymode/SitePages/Home.aspx
- In Teams, you will see the calendar icon on the left panel of the client:
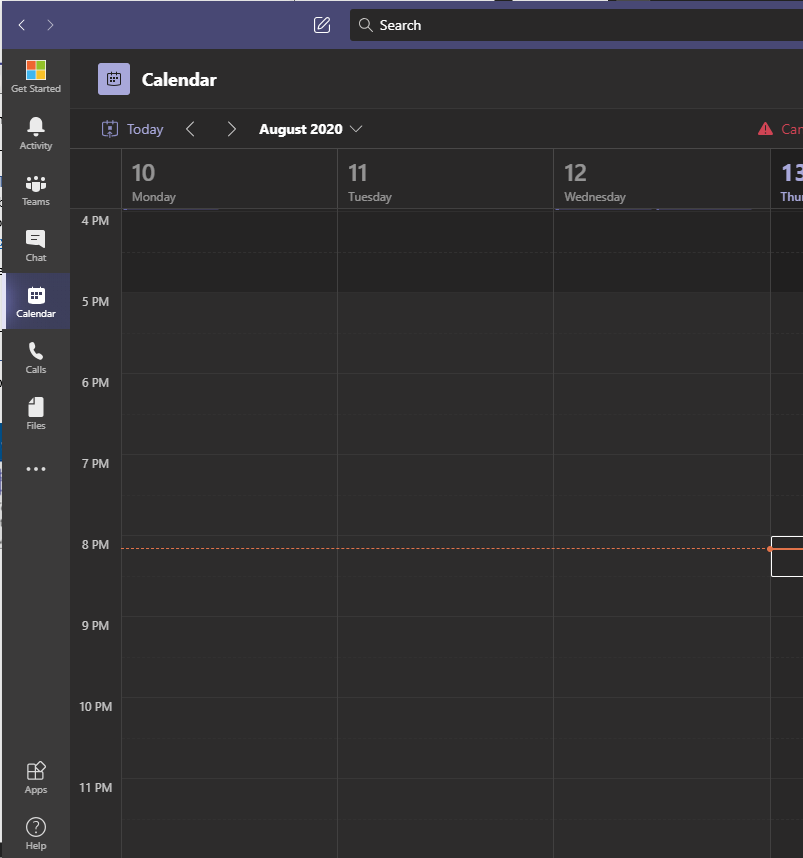
- After you click on calendar, the window will change to your calendar view which synchronizes with your Outlook calendar view. Your work week will appear for you to book meetings.
- To schedule a meeting, click on
 on the top right corner.
 - Enter in the time and date of your meeting and who you wish to invite. When you are finished with the meeting invite details, you may click Save.
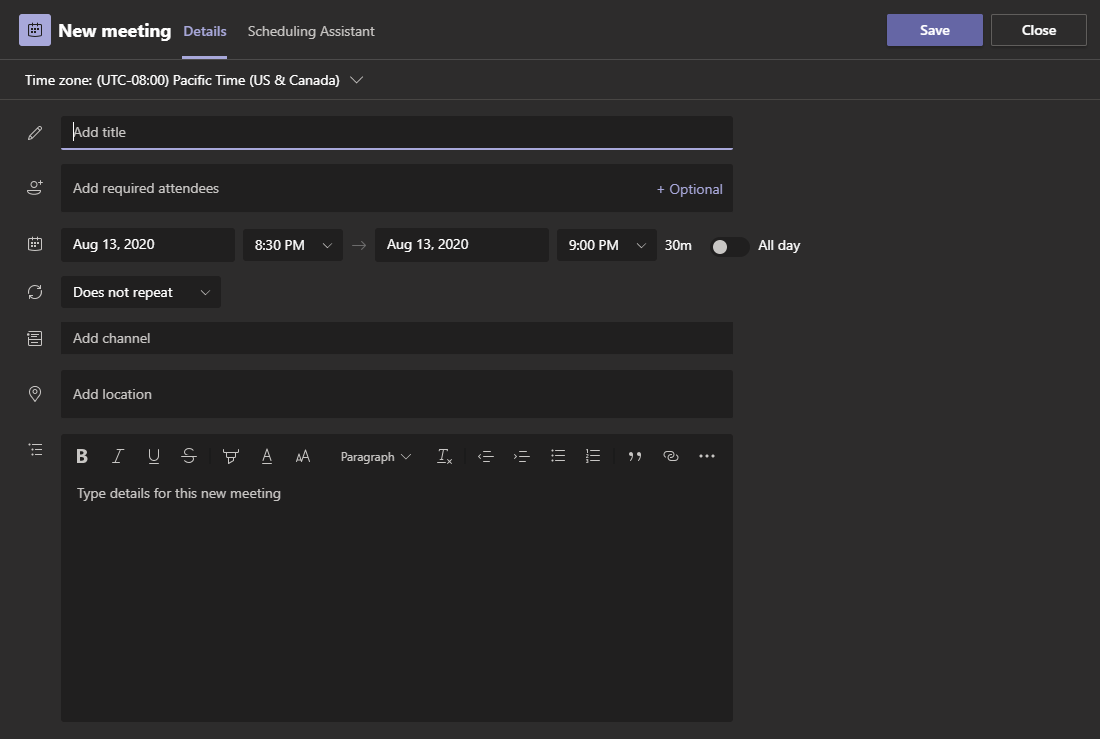
- The invite will then to be sent out to all the attendees as an email notification to accept or decline the meeting.
Note: Only team owners of the team can invite guests to the team.
- Ensure the guest that you are inviting has provided you an external email address that is not an UBC email address.
- To add a guest to your team, go to the Teams application and click on the Team you wish to add the guest into.
- Click on the '…' icon beside the team name and click Add member:
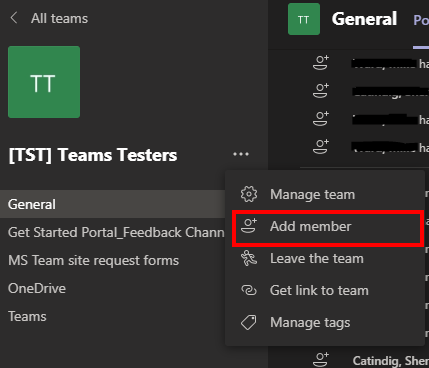
- The window will populate for you to enter the guest's email address, then click 'Add'.
- The guest will then receive an email notification and allow them to join the team.
Start and name a group chat
Start one the same way you start a one-on-one chat: select New chat at the top of your chat list. Select the down arrow to the far right of the To field and type a name for the chat in the Group name field. Then, type the names of the people you'd like to add in the To field.

Yes, multiple people can collaborate on one document. You'll be able to see who is viewing the document and working on the document in which paragraph or sentence.
Here is some additional information on collaborating using Microsoft Word, Excel, and PowerPoint:
You can log into Teams and on the left navigation menu, click on Files. You should be able to locate all the files under Microsoft Teams that have been shared with you.
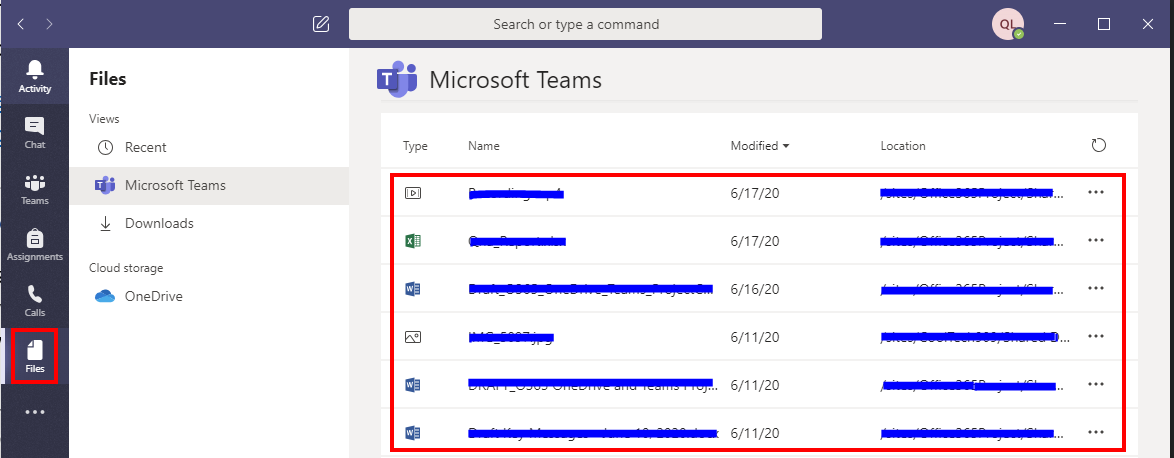
Please follow the instructions provided in the Microsoft Teams support page.
You may only be able to share a file within Teams with the members of your team.
Please note that sharing externally via link will not be available.
You can share externally as a file or folder with an identifiable email address of the guest user by following the steps below:
- Open the Word, Excel or PowerPoint file you wish to share externally if you haven't already have it opened.
- When you are ready to share the document, click on
 located at the top right corner.
 - The following window will populate for you to enter the guest's email address:
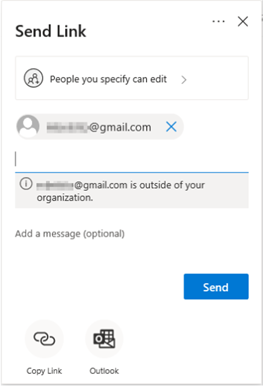
- The recipient receives the following email:
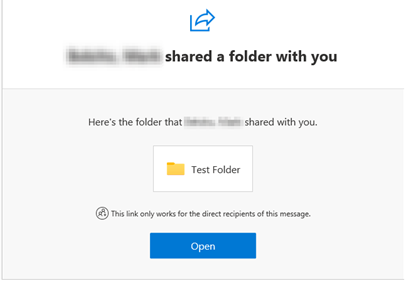
- When they visit the link, they will need to click the "Send Code" button.
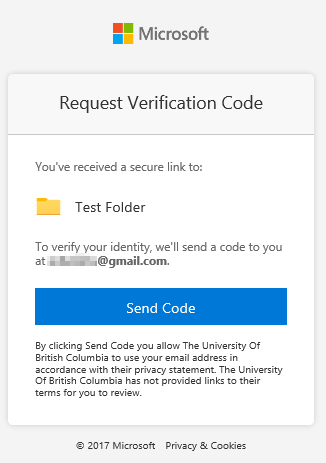
- This will send a code to them to authenticate:

- The user will then enter the code and clicking "Verify".

- If successful, they will get access to the shared OneDrive folder:
These characters are not allowed in channel names in Teams ~ # % & * { } + / \ : < > ? | ' " , .
Channel names also can't start with an underscore (_) or period (.), or end with a period (.).
Refer to Microsoft link for more details on limitations: https://docs.microsoft.com/en-us/microsoftteams/limits-specifications-teams
You may find a lock option from the Microsoft Office 365 apps (Words, Excel, PowerPoint, etc.)
- File > Info > Protect Document > Encrypt with Password.
- Type a password, then type it in again to confirm it.
- Save the file to make sure the password takes effect.
Refer to Microsoft link for more details: https://support.microsoft.com/en-us/office/protect-a-document-with-a-password-05084cc3-300d-4c1a-8416-38d3e37d6826?ui=en-us&rs=en-us&ad=us
Below videos shows you the benefits of using Teams to coordinate with your schoolmates:
- Meet Microsoft Teams for students: https://www.youtube.com/watch?v=xh1GCLo8L1E
- How to use Microsoft Teams for student group projects: https://www.youtube.com/watch?v=Yn0WtuiPOIU
Warning: When you delete a Team, you are permanently deleting the group along with all the team chats, group conversations, files, calendars and any other related information within the Team.
You must be the team owner to delete a team. To do so, go to the team name in which you want to delete and click on More options > Delete the team. Your team will be permanently removed.
Recovery of deleted teams can be restored up to 30 days. Please contact IT Service Centre for recovery request.
For access inquiries, please contact the IT Service Centre.
Visit the Microsoft Teams help & learning page for additional support. Microsoft training videos on Teams are also available.
If you already have MS Teams installed, you may also visit the Get Started portal located at the top left corner of the Teams client for more guidance on how to utilize Teams:

Privacy & Security
A Privacy Impact Assessment (PIA) for MS Teams and OneDrive has been conducted and approved by UBC Safety & Risk Services. Please refer to this link for more information on Privacy Impact Assessment (PIA). All data created and uploaded via MS Teams will be stored in your MS OneDrive account. MS OneDrive is stored securely and hosted in Canada.
Note: UBC students who sign up for a UBC Student Email mailbox will have their CWL ID and email address (cwl@student.ubc.ca) stored outside of Canada and shared with other users that are on the UBC MS 365 tenant. You are required to opt-in and consent to the Terms of Service before signing up using the CWL MyAccount page.
If you are a student and wish to anonymize your CWL account, you may do so by selecting the "Rename CWL" on the CWL MyAccount page once a year. By accepting the Terms of Service, you affirm consent to use your CWL login name to create your UBC Student Email (cwl@student.ubc.ca) and MS Teams access. If you would like to rename your CWL more than once a year, please contact UBC IT Service Centre.
Once your employee/student status is no longer active, you will lose access to MS Teams.
The Personal Chat feature in MS Teams has a 90-day Data Retention Schedule. Conversations will only be retained for 90 days. This schedule will impact all one-to-one conversations and group conversations hosted under the Personal Chat feature. If you have shared files in the conversations, the links will be removed but the files will still be available as shared files in MS OneDrive. Please note that conversations hosted in a "Teams" channel are not impacted by the retention schedule.
No, conversations cannot be recovered once they have been permanently removed from the chat history.
Unfortunately, we cannot accommodate alternate retention schedules. It has been recommended by University Records Management to have a unified retention schedule for all systems to avoid any confusion.
Users will see a note in their chat history informing them that older messages have been removed. There will not be any advance notice that messages will be removed.
Messages in meetings scheduled outside of a Teams channel that are older than 90 days will be removed as part of the retention schedule. Files that have been shared will be retained in the original sender's personal OneDrive.
Integrations
Students:
Your MS Teams and OneDrive account will be integrated with your CWL ID. You will need to login using your email address and CWL password.
Faculty and Staff:
Your MS Teams and OneDrive account will be integrated with your CWL ID and MFA. You will need to login using your email address and CWL password and authenticate using MFA.
At this time, you can only create a MS Teams meeting link in Canvas. Further integrations between Canvas and MS Teams are being investigated.
Yes, please submit your integration request via our feedback form. Please note that integrations with systems will require the completion of a Privacy Impact Assessment.
Known Issues
Users impacted: All Windows PC Teams users Estimated resolution timeline: No ETA More information can be found here. Workaround: Click "Cancel" to ignore the message. The call will work after the warning is dismissed. Additional information can be found here.

The error message is "This account does not allow editing on your device. For an account with full access, contact your organization about your subscription plan."
The workaround is for users to schedule Teams meetings directly on the Teams client.
